从零开始搭建个人博客
从零开始搭建博客,包括注册域名、购买服务器、部署程序及网站配置和优化。
域名
搭建一个博客或者网站,需要有一个域名。那什么是域名呢?看看百度百科上的解释:
域名(英语:Domain Name),又称网域,是由一串用点分隔的名字组成的Internet上某一台计算机或计算机组的名称,用于在数据传输时对计算机的定位标识(有时也指地理位置)。
由于IP 地址具有不方便记忆并且不能显示地址组织的名称和性质等缺点,人们设计出了域名,并通过网域名称系统(DNS,Domain Name System)来将域名和IP 地址相互映射,使人更方便地访问互联网,而不用去记住能够被机器直接读取的IP 地址数串。
简单来说,IP 地址可以标识一台计算机,但是不容易记忆,所以,设计出了域名。而域名就是标识因特网上的一台计算机,由网域名称系统 DNS 来完成域名和 IP 之间的映射。
如何注册域名?有很多网站提供域名注册服务,比如国内的:
国外的:
注册域名的建议:
- 1、建议在正规、出名的网站注册域名,防止网站跑路。我曾经在一个小网站注册了一个域名,使用了几年之后,续期的时候,联系不上对方,导致无法使用该域名,甚至该域名被别人抢注册了。
- 2、在国内网站注册域名,都需要备案。如果不想备案,请在国外网站注册域名。我的域名 chensoul.cc 就是在亚马逊上注册的。一是不想备案,二是对比了上面几个网站,发现亚马逊上的 com 域名价格相对便宜,所以一次性购买了 5 年。
- 3、建议优先注册 com 域名,域名尽可能的简短并且方便记忆。
我曾经注册过的域名:
- javachen.com、javachen.space、javachen.xyz
- huaiu.com
服务器
注册了域名之后,需要一台服务器运行程序。服务器可以是一台物理机,比如你可以使用自己的电脑作为服务器;也可以是一台虚拟的云服务器,比如在云服务提供商购买一台独立的服务器;也可以使用第三方提供的服务器空间,比如 Github 上可以部署静态程序。不管哪种方式,服务器都需要有一个公网 IP,这样才能在因特网上访问你服务器上部署的程序。有了服务器之后,就可以给服务器公网 IP 设置域名解析。
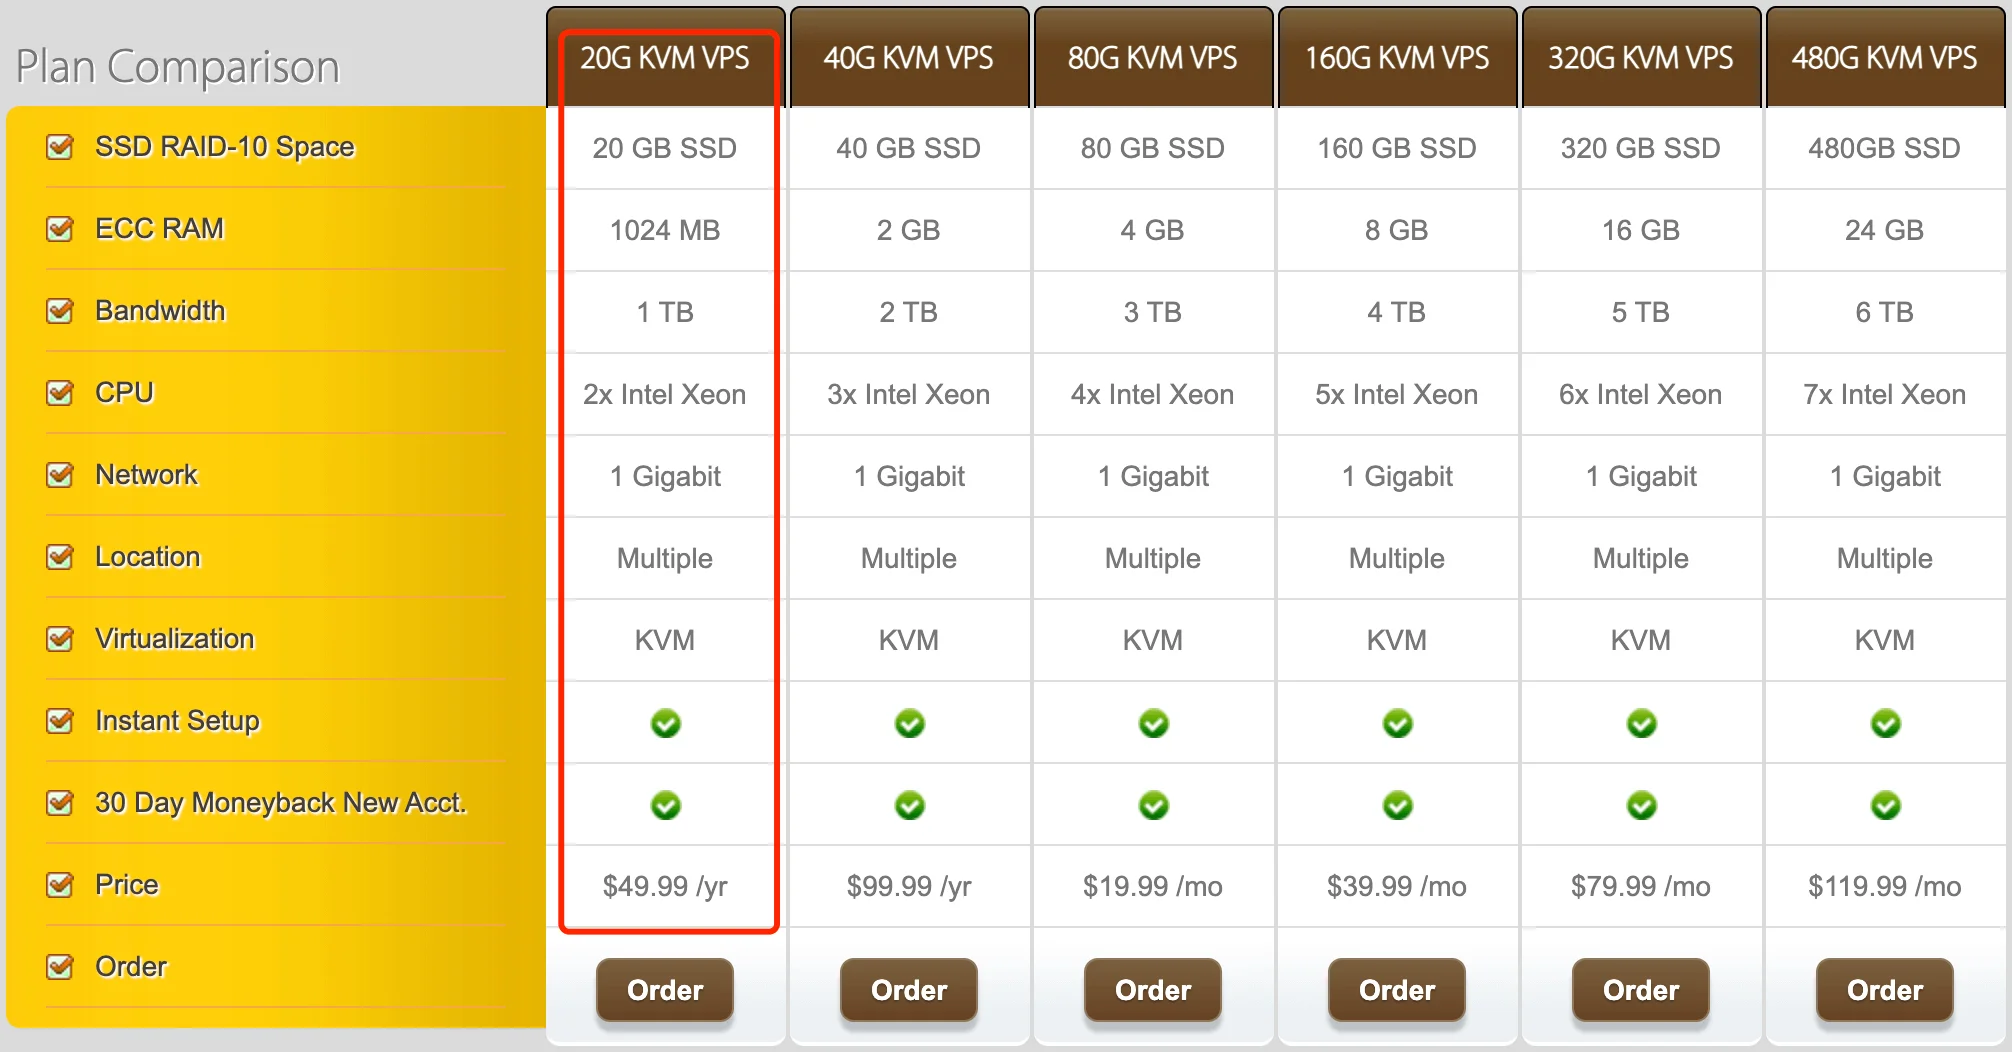
我的服务器是在搬瓦工购买的,一年 49.99 美元。
程序
安装 Hugo

在 Mac 下安装 Hugo:
brew install hugo
新建站点
hugo new site chensoul.github.io -y yaml
上述命令会生成一个名为 chensoul.github.io 的文件夹,下面对文件夹结构做个说明:
$ tree chensoul.github.io
chensoul.github.io
├── archetypes
│   └── default.md
├── config.yaml
├── content
├── data
├── layouts
├── static
└── themes

6 directories, 2 files
新建的站点,还没有加入 Git 版本管理,进入到这个目录下,执行一下如下命令,完成 Git Repo 的初始化:
cd chensoul.github.io
git init .
新建站点后,我们开始添加主题。
添加主题
在 Hugo 的官网上 Hugo Themes 有非常非常多的主题,可以根据自己的喜好选择一个主题。这里,我使用的是 hugo-theme-den 主题。
使用 git submodule–helper 下载主题到 theme 目录下:
git submodule--helper add https://github.com/shaform/hugo-theme-den themes/den --depth=1

git submodule--helper update --init --recursive # needed when you reclone your repo (submodules may not get cloned automatically)
以后,当主题有更新时,执行下面命令更新:
git submodule update --remote --merge
如果遇到异常,可以参考文章解决。
fatal: remote error: upload-pack: not our ref fc7223ca00124e8f5b5b354457379071e2fd091b
启动
启动预览:
hugo server
默认是 1313 端口号,在浏览器中直接访问 http://localhost:1313/ 就可以访问到新建的博客了。
定制化
站点信息
配置网站的基本信息,将 config.yaml 修改如下:
baseURL: https://blog.chensoul.cc/
title: ChenSoul
theme: den
enableRobotsTXT: true
enableEmoji: true
hasCJKLanguage: true
preserveTaxonomyNames: true
rssLimit: 100
page_view_conter: true
enableRelated: true

# Copyright, appears in the footer
# copyright = ""             # default: author.name

# Pagination
# number of entries per page for archives, tags and categories
# since we don't have list view, recommend a large value
paginate: 20
paginatePath: "page"

# Syntax Hightlight
PygmentsCodeFences: true
PygmentsUseClasses: true    # required for shhighlight shortcode

# service plugins
disqusShortname: ""         # disqus_shortname

# language support # en / zh / other... translations present in i18n/
defaultContentLanguage: "zh"           # Default language to use
defaultContentLanguageInSubdir: true

permalinks:
  posts: /posts/:slug/
  categories: /categories/:slug/
  tags: /tags/:slug/
  pages: /:slug/

author:
  name: chensoul
sitemap:
  changefreq: weekly
  priority: 0.5
  filename: sitemap.xml
params:
  since: "2020"
  rssFullContent: true
  keywords:
    - devops
    - programming
  description: Programming | Devops
  logoTitle: ChenSoul
  siteLogoImage: images/fly.png

  # headerTitle = "chensoul"                   # default: title
  headerImage: images/background.webp
  showAuthorCard: true
  showMenuLanguages: true
  autoLoadComments: false
  paginateOriginalStyle: true

  # The date format to use; for a list of valid formats, see https://gohugo.io/functions/format/
  dateFormatToUse: 2006-01-02
  google_verification: "D8XBzUhT4irNUQLKut79HFni0v3Xow4FY-oxUcsUlVk"

  # Link custom CSS and JS assets
  #   (relative to /static/css and /static/js respectively)
  customCSS: []
  customJS: []

markup:
  goldmark:
    renderer:
      unsafe: true


# ------------------------------------- #
# ---- Related Articles --------------- #
# ------------------------------------- #
related:
  # Only include matches with rank >= threshold. This is a normalized rank between 0 and 100.
  threshold: 50

  # To get stable "See also" sections we, by default, exclude newer related pages.
  includeNewer: true

  # Will lower case keywords in both queries and in the indexes.
  toLower: true

  indices:
    - name: categories
      weight: 200
    - name: keywords
      weight: 150
    - name: tags
      weight: 100
languages:
  zh:
    languageCode: zh
    languageName: 中文
    contentDir: content
    weight: 1
    params:
      description: Devops | Programming
    menu:
      main:
        - name: 思考
          weight: 10
          identifier: idea
          url: categories/idea/
      social:
        - name: Telegram
          weight: 10
          identifier: telegram
          url: https://t.me/ichensoul
        - name: Twitter
          weight: 20
          identifier: twitter
          url: https://twitter.com/ichensoul
        - name: BiliBili
          weight: 40
          identifier: bilibili
          url: https://space.bilibili.com/699805065/
      links:
        - name: GitHub
          weight: 10
          identifier: github
          url: https://github.com/chensoul
        - name: Services
          weight: 20
          identifier: services-status
          url: https://uptime.chensoul.cc/status/services
        - name: Analytics
          weight: 30
          identifier: chensoul-analytics
          url: https://data.chensoul.cc/share/8YKX7FUa/pseudoyu-blog
部署
GitHub Actions 部署
1、首先在 github 里创建一个仓库:chensoul.github.io
2、将本地文件提交到 github
cd chensoul.github.io
git init .
echo "# chensoul.github.io" >> README.md
git remote add origin [email protected]:chensoul/chensoul.github.io.git
3、将本地代码推送到仓库
git commit -m "first commit"
git push -u origin main
4、创建 GitHub Actions 的 workflow
mkdir -p .github/workflows
touch .github/workflows/gh-page.yml
gh-page.yml 内容如下:
name: github pages

on:
  workflow_dispatch:
  push:
    branches:
      - hugo

jobs:
  deploy:
    runs-on: ubuntu-18.04
    timeout-minutes: 3
    steps:
      - name: Checkout
        uses: actions/checkout@v2
        with:
          submodules: true # Fetch Hugo themes (true OR recursive)
          fetch-depth: 0 # Fetch all history for .GitInfo and .Lastmod

      - name: Setup hugo
        uses: peaceiris/actions-hugo@v2
        with:
          hugo-version: latest
          extended: true

      - name: Build web
        run: hugo --minify

      - name: Deploy
        uses: peaceiris/actions-gh-pages@v3
        with:
          github_token: ${{ secrets.GITHUB_TOKEN }}
          publish_branch: gh-pages
          publish_dir: ./public
上面的工作流是在 gh-pages 分支上触发,当有代码提交时候,会运行 hugo 命令生成静态文件(public 目录),并且将他们推送到 main 分支。
所以,我们需要基于当前分支创建一个新分支 gh-pages ,并且推送到远程仓库:
git branch gh-pages
git checkout gh-pages
git push origin gh-pages
5、修改代码,推送到仓库,触发工作流
在本地修改某个文件,提交代码,然后在 github 网站 查看工作流
git push origin gh-pages
7、设置自定义域名
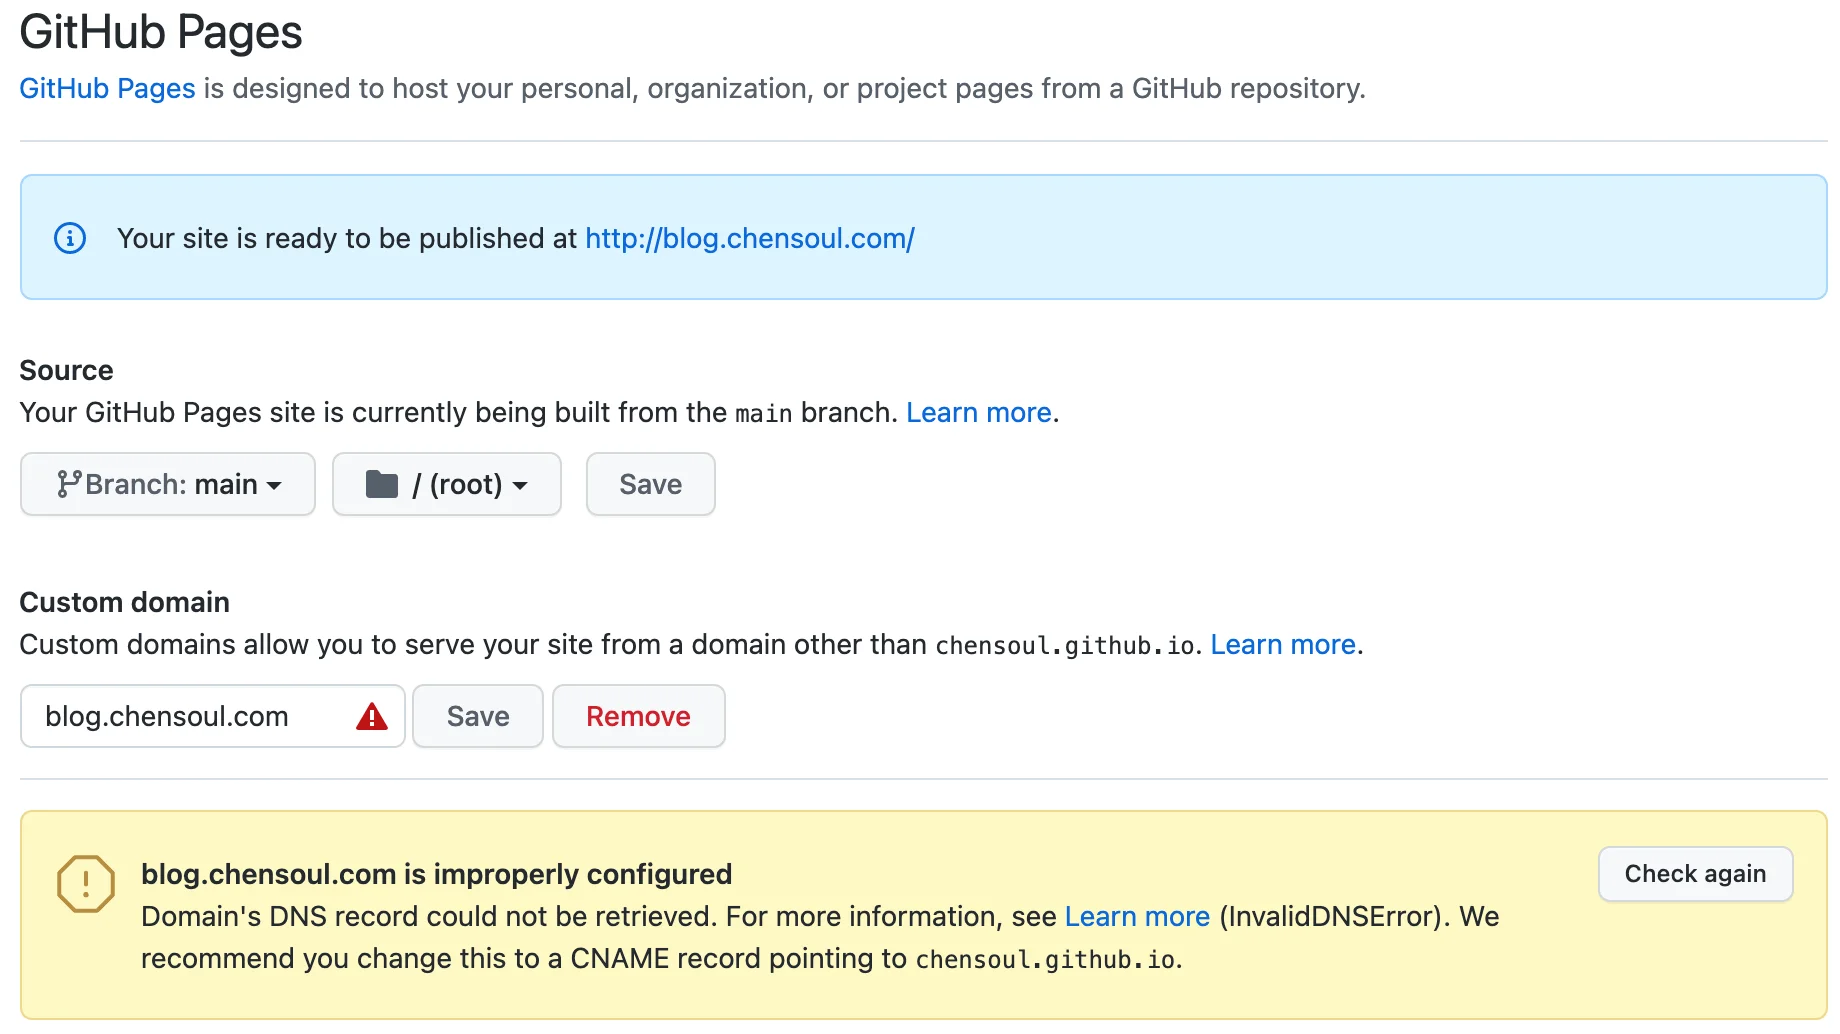
参考管理 GitHub Pages 站点的自定义域,添加一个自定义域名:blog.chensoul.cc:
或者,在仓库的 static 目录创建一个 CNAME 文件,内容为:blog.chensoul.cc,然后,保存提交,Github Actions 会将该文件推送到 main 分支。
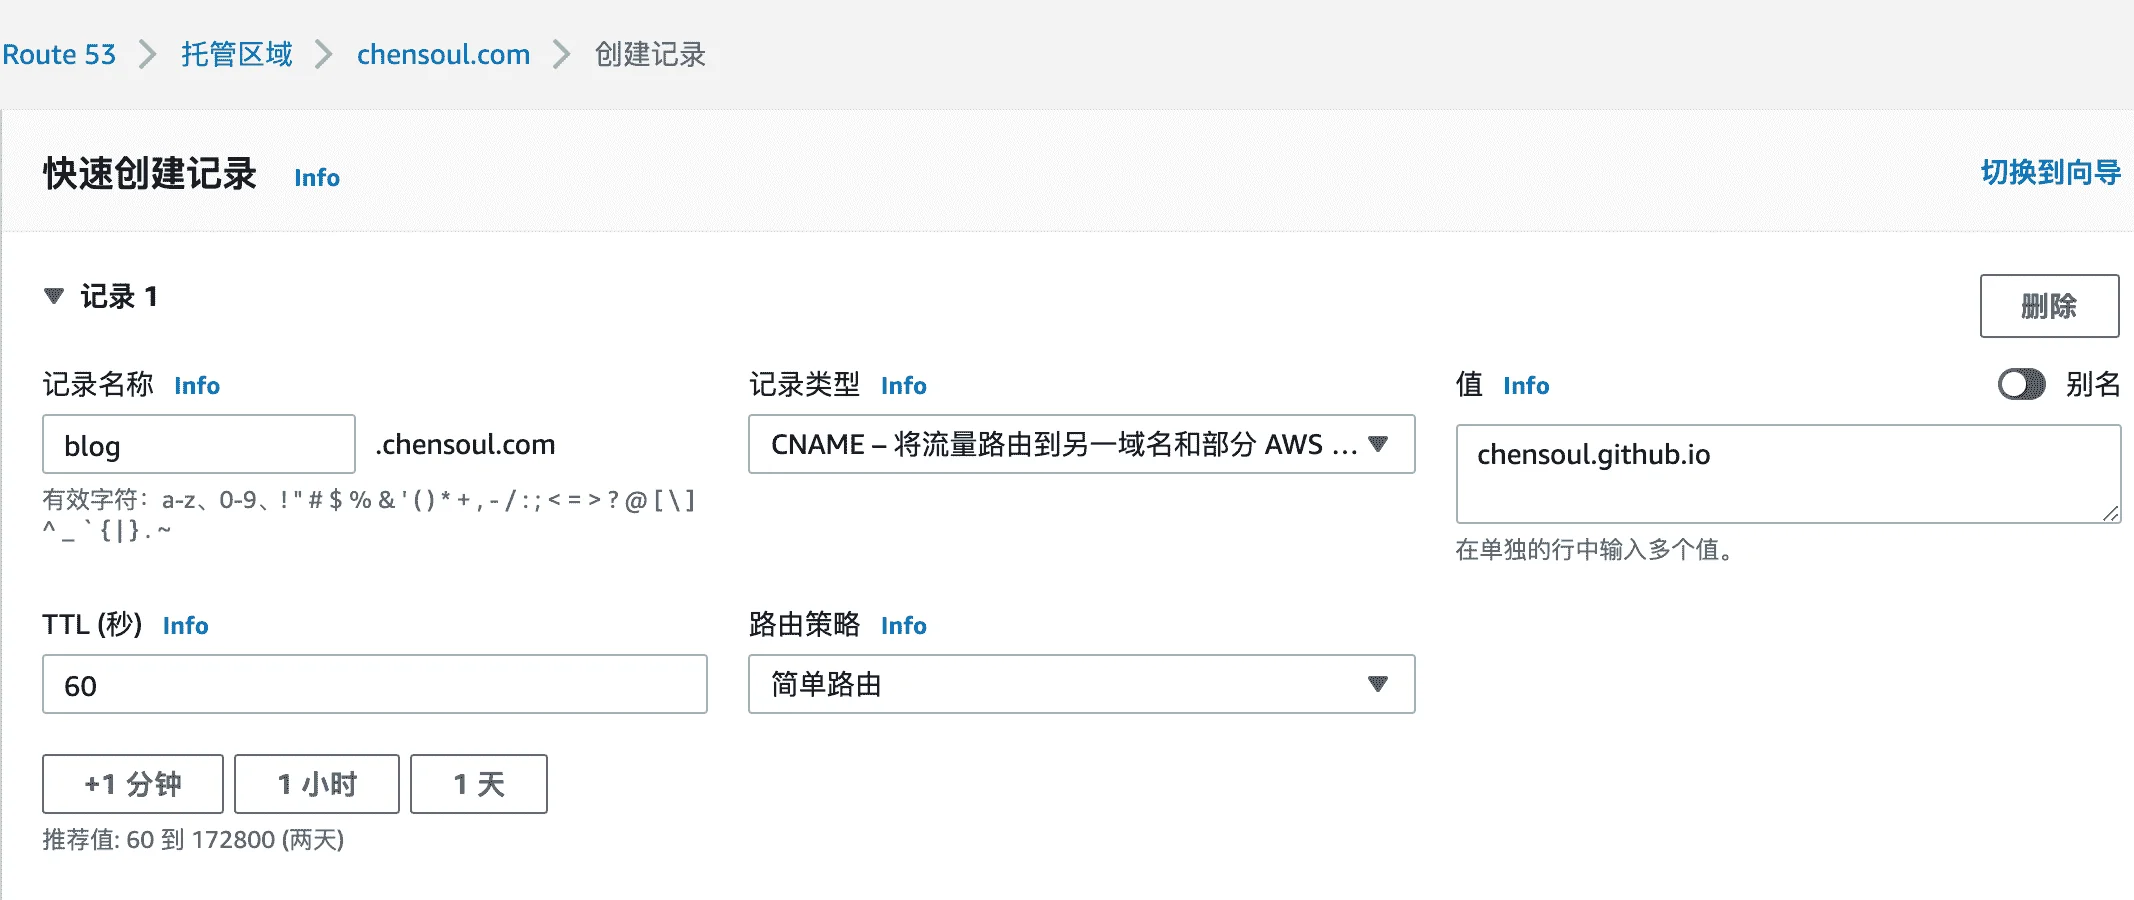
然后,在亚马逊网站添加 CNAME 记录:
8、部署到 CloudFlare Pages