[译]使用Spring Boot2和Spring Security 5以及JDBC令牌存储进行Oauth2集中授权
在这篇文章中,我们将了解如何使用 Spring Boot 2 和 Spring Security 5 OAuth2 来实现集中授权的授权服务器以及如何通过 GUI 对其进行管理,还将提供资源服务器演示以及 github 下的整个项目。
很多示例涵盖了基于早期版本的 Spring boot 2 和 Spring Security 5 使用内存令牌实现 Oauth2,因此想法是使用 MySql 数据库作为令牌存储。
为了深入探讨这个主题,我们必须:
- 配置 Spring 安全。
- 配置数据库。
- 创建授权服务器。
- 创建资源服务器。
- 使用 curl 客户端使用访问令牌获取安全资源。
什么是 Oauth 2?
OAuth 2.0 是行业标准授权协议。 OAuth 2.0 取代了 2006 年创建的原始 OAuth 协议上所做的工作。OAuth 2.0 注重客户端开发人员的简单性,同时为 Web 应用程序、桌面应用程序、移动电话和客厅设备提供特定的授权流程。
该规范及其扩展正在 IETF OAuth 工作组内开发。
Oauth 2 角色
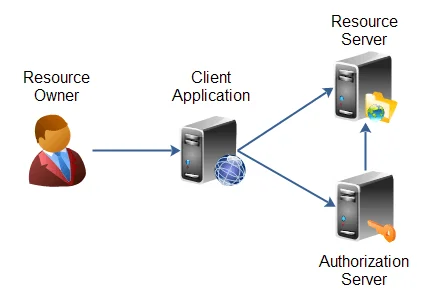
OAuth2 定义了 4 个角色:
资源所有者:通常是您自己。
资源服务器:托管受保护数据的服务器(例如 Google 托管您的个人资料和个人信息)。
客户端:请求访问资源服务器的应用程序(网站、Javascript 应用程序或移动应用程序……)。
授权服务器:向客户端颁发访问令牌的服务器。该令牌将用于客户端请求资源服务器。该服务器可以与资源服务器相同(相同的物理服务器和相同的应用程序),而且经常是这种情况。
下图说明了角色流程:
授权类型
OAuth 2 为不同的用例提供了多种“授权类型”。定义的授权类型型有:
- 授权码:授权码授予是使用您的 Facebook 或 Google 帐户登录应用程序的功能。
- 密码:旨在用于基于用户代理的客户端。其次,授权服务器不会像授权代码授予那样返回授权代码来交换访问令牌,而是返回访问令牌。
- 客户端凭据:客户端可以仅使用其客户端凭据(或其他支持的身份验证方式)请求访问令牌,当客户端请求访问其下的受保护资源控制权,或先前已被其他资源所有者控制的与授权服务器安排。
- 隐式授权:隐式授权是一种简化的授权代码流,针对使用 JavaScript 等脚本语言在浏览器中实现的客户端进行了优化。在隐式流程中,而不是向客户端发出授权代码,直接向客户端颁发访问令牌。
示范
让我们动手吧
业务层
为简单起见,我们的主要业务应用程序将是使用一个实体的产品 API,我们的访问规则将是:
- PRODUCT_CREATE
- PRODUCT_UPDATE
- PRODUCT_DISPLAY
- PRODUCT_ADMIN
OAuth2 客户端设置
要设置 Oauth 2 客户端,我们需要创建下表 [有关更多详细信息,请参阅链接]
- OAUTH_CLIENT_DETAILS
- OAUTH_CLIENT_TOKEN
- OAUTH_ACCESS_TOKEN
- OAUTH_REFRESH_TOKEN
- OAUTH CODE
- OAUTH_APPROVALS
我们将调用像“product_api”这样的资源服务器 对于该服务器,我们定义一个客户端,称为:
- 读-写-客户端(授权授权类型:读、写)
INSERT INTO OAUTH_CLIENT_DETAILS(CLIENT_ID, RESOURCE_IDS, CLIENT_SECRET, SCOPE, AUTHORIZED_GRANT_TYPES, AUTHORITIES, ACCESS_TOKEN_VALIDITY, REFRESH_TOKEN_VALIDITY)
VALUES ('read-write-client', 'product-api','$2a$10$BurTWIy5NTF9GJJH4magz.9Bd4bBurWYG8tmXxeQh1vs7r/wnCFG2','read,write', 'client_credentials', 'ROLE_PRODUCT_ADMIN', 10800, 2592000);
#password [hashed with BCCrypt] :user
权限和用户设置
Spring Security 附带两个有用的接口:
UserDetails — 提供核心用户信息。
GrantedAuthority — 表示授予身份验证对象的权限。
下面的脚本将加载所有权限和凭据(用户):
INSERT INTO authority  VALUES(1,'ROLE_OAUTH_ADMIN');
INSERT INTO authority VALUES(2,'ROLE_ADMIN_PRODUCT');
INSERT INTO authority VALUES(3,'ROLE_RESOURCE_ADMIN');

INSERT INTO credentials VALUES(1,b'1','oauth_admin','$2a$10$BurTWIy5NTF9GJJH4magz.9Bd4bBurWYG8tmXxeQh1vs7r/wnCFG2','0');
INSERT INTO credentials VALUES(2,b'1','resource_admin','$2a$10$BurTWIy5NTF9GJJH4magz.9Bd4bBurWYG8tmXxeQh1vs7r/wnCFG2','0');
INSERT INTO credentials  VALUES(3,b'1','user','$2a$10$BurTWIy5NTF9GJJH4magz.9Bd4bBurWYG8tmXxeQh1vs7r/wnCFG2','0');

INSERT INTO credentials_authorities VALUES (1, 1);
INSERT INTO credentials_authorities VALUES (2, 3);
INSERT INTO credentials_authorities VALUES (3, 2);
#Password : user
API 层
对于演示,基于 Spring Boot 开发了 RESTful 应用程序并公开以下端点:
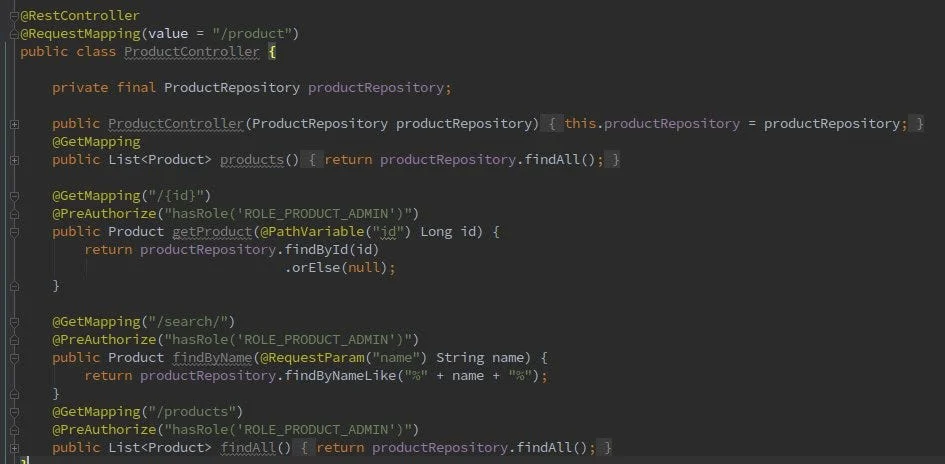
Spring 安全配置
我们必须提供 UserDetailsService 接口的实现,以便获取用户凭据和权限,如下所示
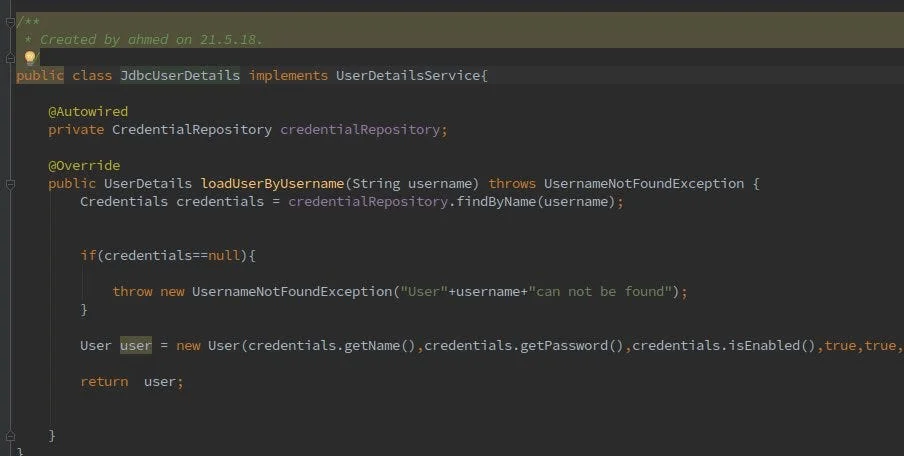
为了向应用程序提供安全性,我们将使用 @EnableWebSecurity 注解和 WebSecurityConfigurerAdapter
@EnableWebSecurity
@Configuration
public class WebSecurityConfiguration extends WebSecurityConfigurerAdapter {
    @Bean
    public PasswordEncoder passwordEncoder() {
        return new BCryptPasswordEncoder();
    }

    @Bean
    @Override
    public UserDetailsService userDetailsServiceBean() throws Exception {
        return new JdbcUserDetails();
    }

    @Override
    public void configure(WebSecurity web) throws Exception {
        web.ignoring().antMatchers("/webjars/**");
    }

    @Override
    protected void configure(HttpSecurity http) throws Exception {
        http
                .authorizeRequests()
                .antMatchers("/login","/logout.do").permitAll()
                .antMatchers("/**").authenticated()
                .and()
                .formLogin()
                .loginProcessingUrl("/login.do")
                .usernameParameter("username")
                .passwordParameter("password")
                .loginPage("/login")
                .and()
                .logout()
                .logoutRequestMatcher(new AntPathRequestMatcher("/logout.do"))
                .and()
                .userDetailsService(userDetailsServiceBean());
    }

    @Override
    protected void configure(AuthenticationManagerBuilder auth) throws Exception {
        auth.userDetailsService(userDetailsServiceBean())
        .passwordEncoder(passwordEncoder());
    }
}
OAuth2 配置
要设置 Oauth 2,需要实现两个组件
- Authorization Server 授权服务器
- Resource Server 资源服务器
授权服务器
授权服务器负责验证用户身份并提供令牌,使用@EnableAuthorizationServer 注解启用授权服务器配置
@Configuration
@EnableAuthorizationServer
public class AuthorizationServerConfiguration extends AuthorizationServerConfigurerAdapter {
    @Bean
    @ConfigurationProperties(prefix = "spring.datasource")
    public DataSource oauthDataSource() {
        return DataSourceBuilder.create().build();
    }

    @Bean
    public JdbcClientDetailsService clientDetailsService() {
        return new JdbcClientDetailsService(oauthDataSource());
    }

    @Bean
    public TokenStore tokenStore() {
        return new JdbcTokenStore(oauthDataSource());
    }

    @Bean
    public ApprovalStore approvalStore() {
        return new JdbcApprovalStore(oauthDataSource());
    }

    @Bean
    public AuthorizationCodeServices authorizationCodeServices() {
        return new JdbcAuthorizationCodeServices(oauthDataSource());
    }

    @Override
    public void configure(ClientDetailsServiceConfigurer clients) throws Exception {
        clients.withClientDetails(clientDetailsService());
    }

    @Override
    public void configure(AuthorizationServerSecurityConfigurer oauthServer) throws Exception {

    }

    @Override
    public void configure(AuthorizationServerEndpointsConfigurer endpoints) throws Exception {
        endpoints
                .approvalStore(approvalStore())
                .authorizationCodeServices(authorizationCodeServices())
                .tokenStore(tokenStore());
    }
}
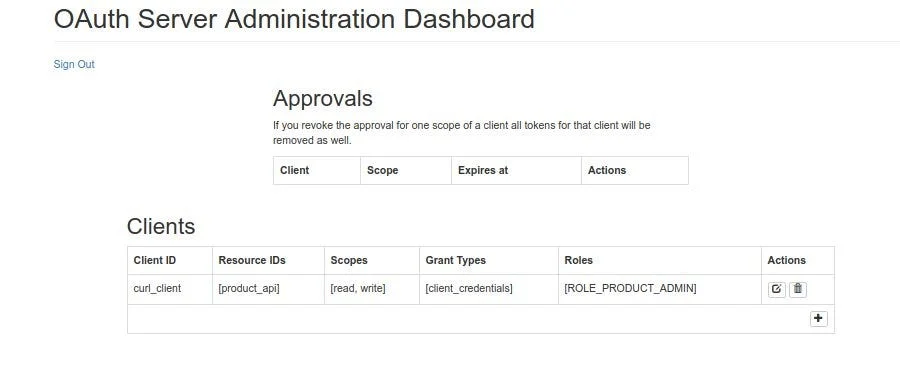
成功配置运行授权服务器后,您将获得登录页面来管理授权服务器
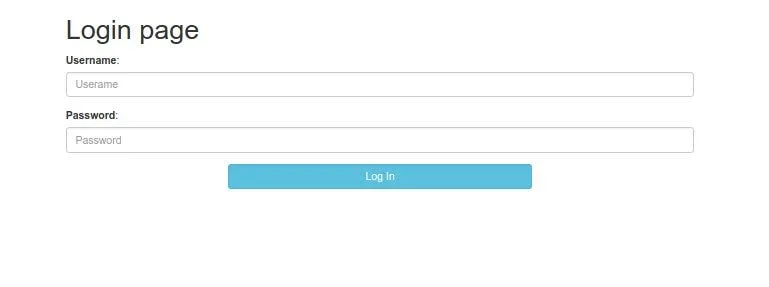
使用 oauth_admin/user 作为用户名/密码访问 Oauth2 仪表板,您可以在其中创建服务器客户端
资源服务器
资源服务器托管受 OAuth2 令牌保护的资源(基本上是我们的产品 API)
@EnableResourceServer
@Configuration
public class ResourcesServerConfiguration  extends ResourceServerConfigurerAdapter {

    @Bean
    @ConfigurationProperties(prefix="spring.datasource")
    public DataSource ouathDataSource(){return DataSourceBuilder.create().build();}

    @Override
    public void configure(ResourceServerSecurityConfigurer resources)throws Exception{
        TokenStore tokenStore=new JdbcTokenStore(ouathDataSource());
        resources.resourceId("product_api").tokenStore(tokenStore);
    }
    @Override

    public void configure(HttpSecurity http) throws Exception{
        http
                .authorizeRequests()
                .antMatchers(HttpMethod.GET, "/**").access("#oauth2.hasScope('read')")
                .antMatchers(HttpMethod.POST, "/**").access("#oauth2.hasScope('write')")
                .antMatchers(HttpMethod.PATCH, "/**").access("#oauth2.hasScope('write')")
                .antMatchers(HttpMethod.PUT, "/**").access("#oauth2.hasScope('write')")
                .antMatchers(HttpMethod.DELETE, "/**").access("#oauth2.hasScope('write')")
                .and()
                .headers().addHeaderWriter((request, response) -> {
            			response.addHeader("Access-Control-Allow-Origin", "*");
                  if (request.getMethod().equals("OPTIONS")) {
                      response.setHeader("Access-Control-Allow-Methods", request.getHeader("Access-Control-Request-Method"));
                      response.setHeader("Access-Control-Allow-Headers", request.getHeader("Access-Control-Request-Headers"));
                  }
        });
    }
}
使用以下 Curl 客户端测试产品列表端点:
#!/bin/sh
TOKEN=`curl -s -u curl_client:user -X POST localhost:8081/oauth/token\?grant_type=client_credentials | egrep -o ‘[a-f0–9-]{20,}’`
echo "Got token for curl client as :$TOKEN"
curl localhost:8083/product/products -H "Authorization: Bearer $TOKEN"
运行 Curl 客户端 bash 脚本后得到响应:
$ ./client.sh
Got token for curl client as : 3be01519–0cab-4049-b87d-617c48bda502
[{“version”:0,”name”:”product_1",”available”:false},{“version”:0,”name”:”product_2",”available”:true}]
从 github 上查看整个代码:https://github.com/Akourtiim/oauth2-spring-boot-2.0.2.git
参考:
- https://tools.ietf.org/html/rfc6749
- https://dzone.com/articles/secure-spring-rest-with-spring-security-and-oauth2
- http://www.bubblecode.net/en/2016/01/22/understanding-oauth2/
- https://github.com/FrontierPsychiatrist/spring-oauth-example
原文链接:Oauth 2 Centralized Authorization with Spring Boot 2.0.2 and Spring Security 5 and JDBC token store [Spring Boot 2.5.8单体应用接入Nacos 1.3.0配置中心完整指南.md](../../../../../work/ads/Spring Boot 2.5.8单体应用接入Nacos 1.3.0配置中心完整指南.md)
