[译]如何在Spring Boot2中使用UserDetailsService实现安全性?

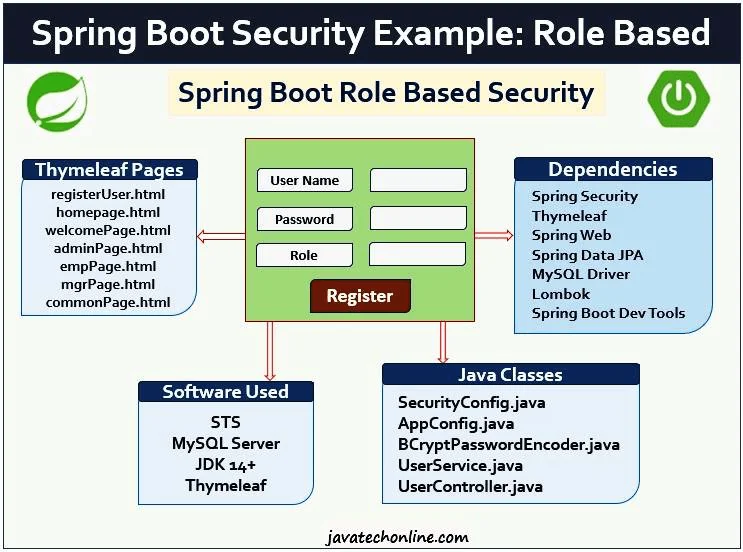
继续上一篇关于实现 Spring Security 的两种不同方法的文章,在本文中,我们将学习第三种方法“如何使用 UserDetailsService 在 Spring Boot 中实现 Security?”。经过上一篇文章后,我希望我们都非常熟悉安全性的基础知识,甚至是 Spring Boot 应用程序中的安全性基础知识。这次我们将创建一个用户注册表并将用户及其角色保存到数据库中。
然后,根据用户角色,我们将借助预定义的 UserDetailsService 检查身份验证和授权功能。
如果您正在寻找“如何在 Spring Boot 3 及以上版本中使用 UserDetailsService 在 Spring Boot 中实现安全性?”,请访问有关使用 Spring Boot 3 的 Spring Security UserDetailsService 的单独文章。
为了说明这一点,我们将把一些角色发挥作用,并在整个过程中围绕它们进行发挥,以使其变得清晰。此外,我们将有一些页面并限制它们仅可由某些特定角色访问。同样重要的是,我们必须创建一个小型 MVC Web 应用程序,以使注册过程向用户开放。用户在注册时将输入自己的角色。然后我们可以在其之上实现安全功能。
让我们开始相应的主题“如何使用 UserDetailsService 在 Spring Boot 中实现安全性?”。
总体而言,您对这篇文章有何期望?
Spring Security 上下文中的 UserDetailsService 概念是什么?
实施 UserDetailsService 有什么好处?
如何使用 UserDetailsService 在 Spring Boot 中实现安全性?
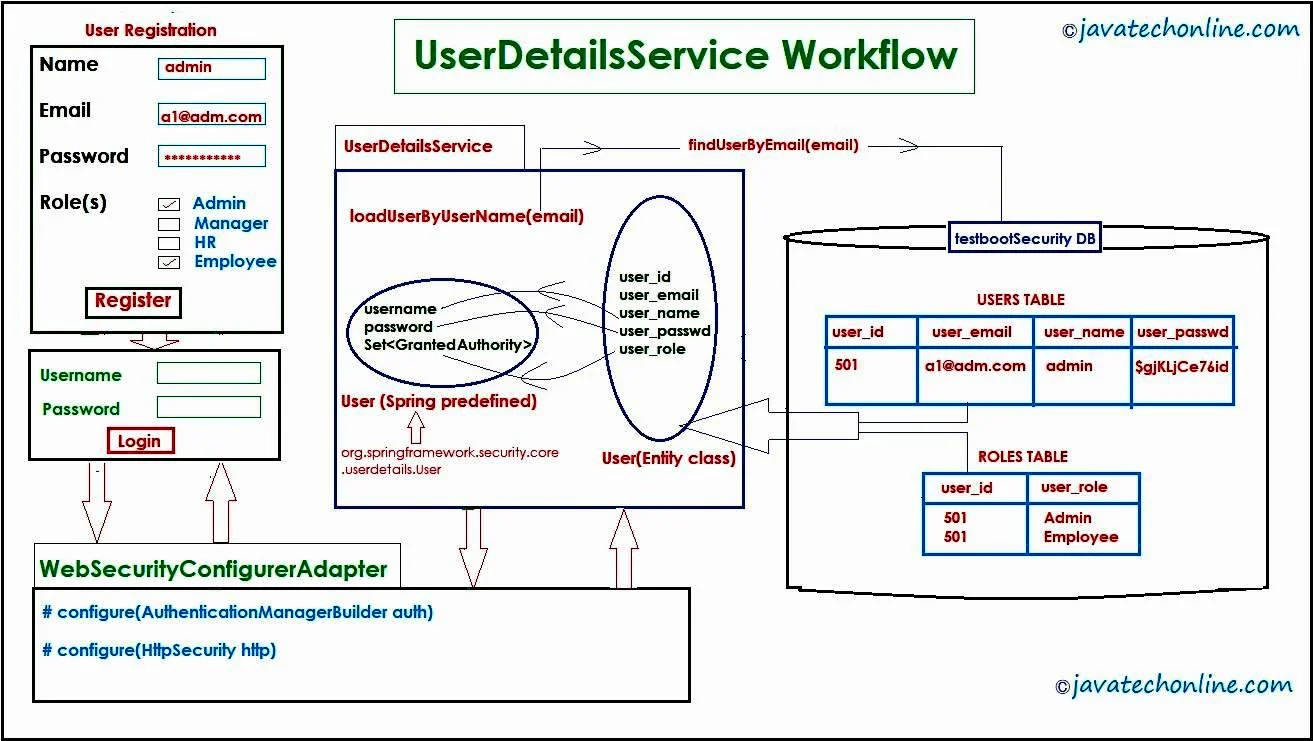
UserDetailsService 在 Spring Security 应用程序中如何内部工作并带有流程图?
另外,如何使用注解:@EnableWebSecurity、@Configuration、@Bean、@GetMapping、@Autowired、@Data、@Entity、@Table、@Id、@GenerateValue、@Column、@ElementCollection、@CollectionTable、@JoinColumn , @服务
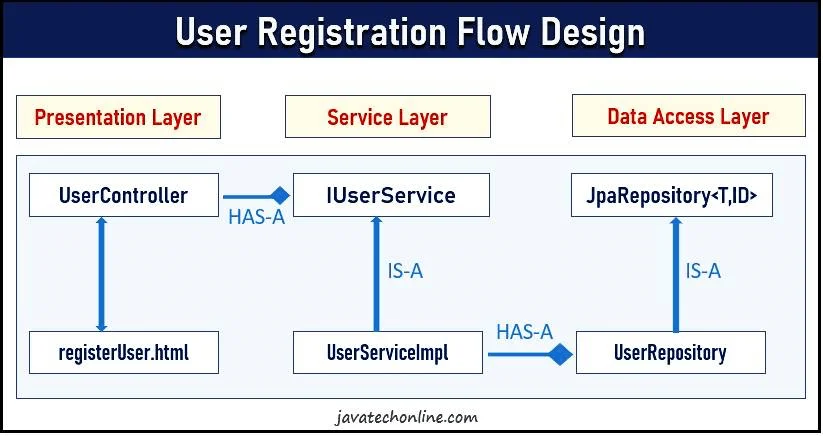
如何使用 Spring MVC 和 Thymeleaf 开发用户注册应用程序?
如何测试启用安全的应用程序?
如何在没有 WebSecurityConfigurerAdapter 的情况下使用 UserDetailsService 在 Spring Boot 中实现安全性?
UserDetailsService 是做什么的?使用它有什么好处?
UserDetailsService 是 Spring 中 org.springframework.security.core.userdetails 包下的预定义接口。我们的实现类实现了这个接口并重写了它的 loadUserByUsername(String username) 方法。此方法返回 UserDetails,它又是一个接口。预定义的 User 类(org.springframework.security.core.userdetails.User)是 UserDetails 接口的实现。总之,在 loadUserByUsername(String username) 方法中,我们传递用户名,它返回我们预定义的 User 对象(org.springframework.security.core.userdetails.User)。
事实上,我们只向 UserDetailsService 提供用户名和一些小的配置,并且我们将所有基于角色的安全功能作为框架的一部分实现。因此,我们在实施安全性方面节省了大量精力。
如何在我们的应用程序中实现 UserDetailsService 安全性?
首先,您必须有一个 Spring Boot Web 应用程序,其中您将有一个表单,即一种用户注册表单。作为 Spring MVC 结构的一部分,您将拥有一个 UserService 实现类。假设它是 UserServiceImpl.java。要记住的第二件事是,您必须将 User 对象转换为预定义的 Spring User 对象。此外,请按照以下步骤在您的应用程序中实现 UserDetailsService。
1)你的用户服务类‘UserServiceImpl.java’应该实现接口 UserDetailsService.java(由 Spring 提供)
2)同样重要的是,重写 UserServiceImpl 类中 UserDetailsService 接口的 loadUserByUsername(String username) 方法。
3)作为实施的一部分,
(A) 借助 UserRepository 中的用户名/电子邮件获取您的用户对象。
(B) 将你的 User 对象相应地转换为 Spring 预定义的 User 对象(org.springframework.security.core.userdetails.User)。
(C) 返回 Spring 定义的 User 对象,它是 UserDetails(方法的返回类型)的实现。
下面的代码代表了 UserDetailsService 的实现。但是,您将在下面的部分中看到完整的代码。
UserServiceImpl.java
import org.springframework.beans.factory.annotation.Autowired;
import org.springframework.stereotype.Service;

import java.util.HashSet;
import java.util.List;
import java.util.Optional;
import java.util.Set;
import java.util.stream.Collectors;

@Service
public class UserServiceImpl implements IUserService, UserDetailsService {
	@Autowired
	private UserRepository userRepo;

	@Override
	public UserDetails loadUserByUsername(String email) throws UsernameNotFoundException {

		Optional<User> opt = userRepo.findUserByEmail(email);

		org.springframework.security.core.userdetails.User springUser = null;

		if (opt.isEmpty()) {
			throw new UsernameNotFoundException("User with email: " + email + " not found");
		} else {
			User user = opt.get();

			List<String> roles = user.getRoles();
			Set<GrantedAuthority> ga = new HashSet<>();
			for (String role : roles) {
				ga.add(new SimpleGrantedAuthority(role));
			}

			springUser = new org.springframework.security.core.userdetails.User(
				email,
				user.getPassword(),
				ga);

		}

		return springUser;
	}

}
UserDetailsService 在 Spring Security 应用程序内部如何工作?

一旦用户输入用户名和密码并单击“登录”按钮,就会调用 WebSecurityConfigurerAdapter,该适配器在内部调用 UserServiceImpl.java(实现类,由程序员提供)。此外,UserServiceImpl.java 中实现的 loadUserByUserName()方法将我们的 User 对象转换为 Spring 提供的 User 对象。此外,我们的 SecurityConfig.java 扩展了 WebSecurityConfigurerAdapter 并通过两种方法提供了身份验证和授权逻辑的实现;分别配置(AuthenticationManagerBuilder)和配置(HttpSecurity),如下面的代码所示。
SecurityConfig.java
import org.springframework.beans.factory.annotation.Autowired;
import org.springframework.context.annotation.Configuration;

@EnableWebSecurity
@Configuration
public class SecurityConfig extends WebSecurityConfigurerAdapter {
	@Autowired
	private UserDetailsService uds;
	@Autowired
	private BCryptPasswordEncoder encoder;

	@Override
	protected void configure(AuthenticationManagerBuilder auth) throws Exception {
		auth.userDetailsService(uds).passwordEncoder(encoder);
	}

	@Override
	protected void configure(HttpSecurity http) throws Exception {
		http.authorizeRequests()
			.antMatchers("/home", "/register", "/saveUser").permitAll()
			.antMatchers("/welcome").authenticated()
			.antMatchers("/admin").hasAuthority("Admin")
			.antMatchers("/mgr").hasAuthority("Manager")
			.antMatchers("/emp").hasAuthority("Employee")
			.antMatchers("/hr").hasAuthority("HR")
			.antMatchers("/common").hasAnyAuthority("Employeee,Manager,Admin")
			.anyRequest().authenticated().and()
			.formLogin()
			.defaultSuccessUrl("/welcome", true).and()
			.logout()
			.logoutRequestMatcher(new AntPathRequestMatcher("/logout")).and()
			.exceptionHandling()
			.accessDeniedPage("/accessDenied");
	}
}
注意:从 Spring Security 5.7.0-M2 开始,WebSecurityConfigurerAdapter 已被弃用。因此,如果您使用 Spring Security 5.7.0-M2 或更高版本,请更新您的实现,如下面的代码片段所示。此外,为了了解实现自定义配置类的新方法,请访问有关不使用 WebSecurityConfigurerAdapter 的 Spring Security 的单独文章。
SecurityConfig.java
package com.dev.springboot.security.UserDetailsService.config;

import org.springframework.beans.factory.annotation.Autowired;
import org.springframework.context.annotation.Bean;
import org.springframework.context.annotation.Configuration;
import org.springframework.security.authentication.AuthenticationProvider;
import org.springframework.security.authentication.dao.DaoAuthenticationProvider;
import org.springframework.security.config.annotation.web.builders.HttpSecurity;
import org.springframework.security.config.annotation.web.configuration.EnableWebSecurity;
import org.springframework.security.core.userdetails.UserDetailsService;
import org.springframework.security.crypto.bcrypt.BCryptPasswordEncoder;
import org.springframework.security.web.SecurityFilterChain;
import org.springframework.security.web.util.matcher.AntPathRequestMatcher;

@EnableWebSecurity
@Configuration
public class SecurityConfig {

	@Autowired
	private UserDetailsService uds;

	@Autowired
	private BCryptPasswordEncoder encoder;

	@Bean
	public SecurityFilterChain filterChain(HttpSecurity http) throws Exception {

		http.authorizeRequests()
		.antMatchers("/home","/register","/saveUser").permitAll()
		.antMatchers("/welcome").authenticated()
		.antMatchers("/admin").hasAuthority("Admin")
		.antMatchers("/mgr").hasAuthority("Manager")
		.antMatchers("/emp").hasAuthority("Employee")
		.antMatchers("/hr").hasAuthority("HR")
		.antMatchers("/common").hasAnyAuthority("Employeee,Manager,Admin")
		.anyRequest().authenticated()

		.and()
		.formLogin()
		.defaultSuccessUrl("/welcome",true)

		.and()
		.logout()
		.logoutRequestMatcher(new AntPathRequestMatcher("/logout"))

		.and()
		.exceptionHandling()
		.accessDeniedPage("/accessDenied")

		.and()
		.authenticationProvider(authenticationProvider());

		return http.build();

	}

	@Bean
	public AuthenticationProvider authenticationProvider() {
		DaoAuthenticationProvider authenticationProvider = new DaoAuthenticationProvider();
		authenticationProvider.setUserDetailsService(uds);
		authenticationProvider.setPasswordEncoder(encoder);
		return authenticationProvider;
	}
}
实现 UserDetailsService 的示例
为了说明 UserDetailsService 的实现,我们假设一个小公司的内部门户。在公司中,我们的员工扮演着各种角色,例如管理员、人力资源、经理,当然还有员工。此外,门户还具有基于角色的页面访问权限。甚至某些页面可供所有角色访问,而其他页面则仅限于某些特定角色。
同样重要的是,公司将有一个用户注册页面,即使没有登录,所有用户也必须可以访问该页面。现在让我们创建一个标准用户注册流程,如下所示。

步骤#1:在 STS(Spring Tool Suite)中创建一个 Spring Boot Starter 项目
创建入门项目时,选择“Spring Security”、“Thymeleaf”、“Spring Web”、“Spring Data JPA”、“MySQL Driver”、“Lombok”和“Spring Boot DevTools”作为入门项目依赖项。即使您不知道如何创建 Spring Boot 入门项目,也请访问“如何在 Spring boot 中创建入门项目?”的内部链接。另外,如果您想了解有关 Lombok 的更多信息,请访问 Lombok 上的内部链接。
步骤#2:更新数据库配置
更新 application.properties 以连接到 MySQL 数据库。请注意,我们还可以省略 driver-class-name,因为 Spring Boot 会自动从数据库 URL 中找到它,如下所示。不过,建议保留。
#application.properties
---------------------------------------------------------------------
#-------------------- server properties ---------------
server.port=8080

#--------------------- DB Connection ------------------
#AutoLoading of driver class since JDBC 4
#spring.datasource.driver-class-name=com.mysql.cj.jdbc.Driver
spring.datasource.url=jdbc:mysql://localhost:3306/testBootSecurity
spring.datasource.username=root
spring.datasource.password=devs

#--------------------JPA-ORM Properties-----------------
spring.jpa.show-sql=true
spring.jpa.hibernate.ddl-auto=update
#spring.jpa.database-platform=org.hibernet.dialect.MySQL8Dialect
步骤#3:创建用户实体和存储库类
现在创建 User.java 和 UserRepositoty.java 如下。同样重要的是,User.java 有一个 List 类型的变量“roles”。它将在数据库中创建一个单独的表,其中相应地包含两列 user_id 和 user_role 。此外,@ElementCollection(fetch= FetchType.EAGER)表示在获取 User 对象的同时,也同时获取角色。另一方面,UserRepository 扩展了“JpaRepository”以利用内置数据库操作。
User.java
package com.dev.springboot.security.UserDetailsService.model;

import java.util.List;

import javax.persistence.CollectionTable;
import javax.persistence.Column;
import javax.persistence.ElementCollection;
import javax.persistence.Entity;
import javax.persistence.FetchType;
import javax.persistence.GeneratedValue;
import javax.persistence.Id;
import javax.persistence.JoinColumn;
import javax.persistence.Table;

import lombok.Data;

@Data
@Entity
@Table(name="users")
public class User {

	@Id
	@GeneratedValue
	@Column(name="user_id")
	private Integer id;

	@Column(name="user_name")
	private String name;

	@Column(name="user_passwd")
	private String password;

	@Column(name="user_email")
	private String email;

	@ElementCollection(fetch= FetchType.EAGER)
	@CollectionTable(
			name="roles",
			joinColumns = @JoinColumn(name="user_id")
			)
	@Column(name="user_role")
	private List<String> roles;

}
UserRepository.java
package com.dev.springboot.security.UserDetailsService.repo;

import java.util.Optional;

import org.springframework.data.jpa.repository.JpaRepository;

import com.dev.springboot.security.UserDetailsService.model.User;

public interface UserRepository extends JpaRepository<User, Integer> {

	Optional<User> findUserByEmail(String email);
}
步骤#4:创建 AppConfig 类来实例化 BCryptPasswordEncoder
由于 BCryptPasswordEncoder 是一个预定义的类,因此我们需要在 AppConfig.java 中提供它的实例化代码作为配置类。此外,需要 BCryptPasswordEncoder 在其他类中对我们的密码值进行编码。
AppConfig.java
package com.dev.springboot.security.UserDetailsService.config;

import org.springframework.context.annotation.Bean;
import org.springframework.context.annotation.Configuration;
import org.springframework.security.crypto.bcrypt.BCryptPasswordEncoder;

@Configuration
public class AppConfig {

	@Bean
	public BCryptPasswordEncoder passwordEncoder() {
		return new BCryptPasswordEncoder();
	}
}
步骤#5:创建服务接口和服务实现类
相应地创建服务接口和服务 Impl 类作为 IUserService.java 和 UserServiceImpl.java,如下所示。事实上,UserServiceImpl.java 中 loadUserByUsername(String email) 方法的实现是整个 UserDetailsService 中最重要的部分。
IUserService.java
package com.dev.springboot.security.UserDetailsService.service;

import com.dev.springboot.security.UserDetailsService.model.User;

public interface IUserService {

	public Integer saveUser(User user);
}
UserServiceImpl.java
package com.dev.springboot.security.UserDetailsService.service.impl;

import java.util.HashSet;
import java.util.List;
import java.util.Optional;
import java.util.Set;

import org.springframework.beans.factory.annotation.Autowired;
import org.springframework.security.core.GrantedAuthority;
import org.springframework.security.core.authority.SimpleGrantedAuthority;
import org.springframework.security.core.userdetails.UserDetails;
import org.springframework.security.core.userdetails.UserDetailsService;
import org.springframework.security.core.userdetails.UsernameNotFoundException;
import org.springframework.security.crypto.bcrypt.BCryptPasswordEncoder;
import org.springframework.stereotype.Service;

import com.dev.springboot.security.UserDetailsService.model.User;
import com.dev.springboot.security.UserDetailsService.repo.UserRepository;
import com.dev.springboot.security.UserDetailsService.service.IUserService;

@Service
public class UserServiceImpl implements IUserService, UserDetailsService{

	@Autowired
	private UserRepository userRepo;

	@Autowired
	private BCryptPasswordEncoder passwordEncoder;

	@Override
	public Integer saveUser(User user) {
		String passwd= user.getPassword();
		String encodedPasswod = passwordEncoder.encode(passwd);
		user.setPassword(encodedPasswod);
		user = userRepo.save(user);
		return user.getId();
	}

	@Override
	public UserDetails loadUserByUsername(String email) throws UsernameNotFoundException {

		Optional<User> opt = userRepo.findUserByEmail(email);

		org.springframework.security.core.userdetails.User springUser=null;

		if(opt.isEmpty()) {
			throw new UsernameNotFoundException("User with email: " +email +" not found");
		}else {
			User user =opt.get();
			List<String> roles = user.getRoles();
			Set<GrantedAuthority> ga = new HashSet<>();
			for(String role:roles) {
				ga.add(new SimpleGrantedAuthority(role));
			}

			springUser = new org.springframework.security.core.userdetails.User(
							email,
							user.getPassword(),
							ga );

		}

		return springUser;
	}
}
步骤#6:创建一个 UserController 类
随后,为用户编写一个控制器类“UserController.java”,它将控制用户注册页面。
UserController.java
package com.dev.springboot.security.UserDetailsService.controller;

import org.springframework.beans.factory.annotation.Autowired;
import org.springframework.stereotype.Controller;
import org.springframework.ui.Model;
import org.springframework.web.bind.annotation.GetMapping;
import org.springframework.web.bind.annotation.ModelAttribute;
import org.springframework.web.bind.annotation.PostMapping;

import com.dev.springboot.security.UserDetailsService.model.User;
import com.dev.springboot.security.UserDetailsService.service.IUserService;

@Controller
public class UserController {

	@Autowired
	private IUserService userService;

	/ Go to Registration Page
	@GetMapping("/register")
	public String register() {
		return "registerUser";
	}

	/ Read Form data to save into DB
	@PostMapping("/saveUser")
	public String saveUser(
			@ModelAttribute User user,
			Model model
			)
	{
		Integer id = userService.saveUser(user);
		String message = "User '"+id+"' saved successfully !";
		model.addAttribute("msg", message);
		return "registerUser";
	}
}
步骤#7:编写一个控制器类来浏览页面
除了 UserController,再编写一个控制器类并将其命名为“HomeController.java”。该类将负责浏览不同的页面。
HomeController.java
package com.dev.springboot.security.UserDetailsService.controller;

import org.springframework.stereotype.Controller;
import org.springframework.web.bind.annotation.GetMapping;

@Controller
public class HomeController {

	@GetMapping("/home")
	public String getHomePage() {
		return "homePage";
	}

	@GetMapping("/welcome")
	public String getWelcomePage() {
		return "welcomePage";
	}

	@GetMapping("/admin")
	public String getAdminPage() {
		return "adminPage";
	}

	@GetMapping("/emp")
	public String getEmployeePage() {
		return "empPage";
	}

	@GetMapping("/mgr")
	public String getManagerPage() {
		return "mgrPage";
	}

	@GetMapping("/hr")
	public String getHrPage() {
		return "hrPage";
	}

	@GetMapping("/common")
	public String getCommonPage() {
		return "commonPage";
	}

	@GetMapping("/accessDenied")
	public String getAccessDeniedPage() {
		return "accessDeniedPage";
	}
}
步骤#8:编写 UI 页面(Thymeleaf)
以下是 UI 页面的 .html 文件。将这些页面相应地放入“src/main/resources/templates”文件夹中。
registerUser.html
<!DOCTYPE html>
<html xmlns:th="http://www.thymeleaf.org">
  <head>
    <meta charset="ISO-8859-1" />
    <title>User Registration</title>
  </head>
  <body>
    <h3>User Registration</h3>
    <form action="saveUser" method="post">
      <pre>
Name :    <input type="text" name="name"/>

Email:    <input type="text" name="email"/>

Password: <input type="password" name="password"/>

Role(s): <input type="checkbox" name="roles" value="Admin"/>Admin
         <input type="checkbox" name="roles" value="Manager"/>Manager
 	 <input type="checkbox" name="roles" value="HR"/>HR
	 <input type="checkbox" name="roles" value="Employee"/>Employee
<input type="hidden" th:name="${_csrf.parameterName}" th:value="${_csrf.token}"/>
    <input type="submit" value="Register"/>

</pre>
    </form>
    <div th:text="${msg}"></div>
  </body>
</html>
homePage.html
<!DOCTYPE html>
<html xmlns:th="http://www.thymeleaf.org">
  <head>
    <meta charset="ISO-8859-1" />
    <title>Insert title here</title>
  </head>
  <body>
    <h3>welcome to the Home Page</h3>
    This page is accessible to ALL.
  </body>
</html>
welcomePage.html
<!DOCTYPE html>
<html xmlns:th="http://www.thymeleaf.org">
  <head>
    <meta charset="ISO-8859-1" />
    <title>Insert title here</title>
  </head>
  <body>
    <h3>Welcome Page after successful Login</h3>
    <a th:href="@{/logout}">LOGOUT</a>
  </body>
</html>
adminPage.html
<!DOCTYPE html>
<html xmlns:th="http://www.thymeleaf.org">
  <head>
    <meta charset="ISO-8859-1" />
    <title>Insert title here</title>
  </head>
  <body>
    <h3>Admin Page</h3>
    Welcome to Admin page.!!!
    <a th:href="@{/logout}">LOGOUT</a>
  </body>
</html>
empPage.html
<!DOCTYPE html>
<html xmlns:th="http://www.thymeleaf.org">
  <head>
    <meta charset="ISO-8859-1" />
    <title>Insert title here</title>
  </head>
  <body>
    <h3>Employee Page</h3>
    <a th:href="@{/logout}">LOGOUT</a>
  </body>
</html>
mgrPage.html
<!DOCTYPE html>
<html xmlns:th="http://www.thymeleaf.org">
  <head>
    <meta charset="ISO-8859-1" />
    <title>Insert title here</title>
  </head>
  <body>
    <h3>Manager Page</h3>
    <a th:href="@{/logout}">LOGOUT</a>
  </body>
</html>
hrPage.html
<!DOCTYPE html>
<html xmlns:th="http://www.thymeleaf.org">
  <head>
    <meta charset="ISO-8859-1" />
    <title>Insert title here</title>
  </head>
  <body>
    <h3>HR Page</h3>
    <a th:href="@{/logout}">LOGOUT</a>
  </body>
</html>
commonPage.html
<!DOCTYPE html>
<html xmlns:th="http://www.thymeleaf.org">
  <head>
    <meta charset="ISO-8859-1" />
    <title>Insert title here</title>
  </head>
  <body>
    <h3>You are not allowed to access this page. Please go to Welcome Page</h3>
    <a th:href="@{/welcome}">Welcome</a>
    <a th:href="@{/logout}">LOGOUT</a>
  </body>
</html>
accessDeniedPage.html
<!DOCTYPE html>
<html xmlns:th="http://www.thymeleaf.org">
  <head>
    <meta charset="ISO-8859-1" />
    <title>Insert title here</title>
  </head>
  <body>
    <h3>You are not allowed to access this page. Please go to Welcome Page</h3>
    <a th:href="@{/welcome}">Welcome</a>
    <a th:href="@{/logout}">LOGOUT</a>
  </body>
</html>
步骤#9:编写 SecurityConfig 类
最后,编写另一个重要的类 SecurityConfig.java ,它将扩展预定义的类 WebSecurityConfigurerAdapter.java 并相应地实现两个 configure() 方法,如下所示。
SecurityConfig.java
package com.dev.springboot.security.UserDetailsService.config;

import org.springframework.beans.factory.annotation.Autowired;
import org.springframework.context.annotation.Configuration;
import org.springframework.security.config.annotation.authentication.builders.AuthenticationManagerBuilder;
import org.springframework.security.config.annotation.web.builders.HttpSecurity;
import org.springframework.security.config.annotation.web.configuration.EnableWebSecurity;
import org.springframework.security.config.annotation.web.configuration.WebSecurityConfigurerAdapter;
import org.springframework.security.core.userdetails.UserDetailsService;
import org.springframework.security.crypto.bcrypt.BCryptPasswordEncoder;
import org.springframework.security.web.util.matcher.AntPathRequestMatcher;

@EnableWebSecurity
@Configuration
public class SecurityConfig extends WebSecurityConfigurerAdapter {

	@Autowired
	private UserDetailsService uds;

	@Autowired
	private BCryptPasswordEncoder encoder;

	@Override
	protected void configure(AuthenticationManagerBuilder auth) throws Exception {

		auth.userDetailsService(uds).passwordEncoder(encoder);
	}

	@Override
	protected void configure(HttpSecurity http) throws Exception {

		http.authorizeRequests()
		.antMatchers("/home","/register","/saveUser").permitAll()
		.antMatchers("/welcome").authenticated()
		.antMatchers("/admin").hasAuthority("Admin")
		.antMatchers("/mgr").hasAuthority("Manager")
		.antMatchers("/emp").hasAuthority("Employee")
		.antMatchers("/hr").hasAuthority("HR")
		.antMatchers("/common").hasAnyAuthority("Employeee,Manager,Admin")
		.anyRequest().authenticated()

		.and()
		.formLogin()
		.defaultSuccessUrl("/welcome",true)

		.and()
		.logout()
		.logoutRequestMatcher(new AntPathRequestMatcher("/logout"))

		.and()
		.exceptionHandling()
		.accessDeniedPage("/accessDenied");

	}
}
步骤#9A:编写 SecurityConfig 类而不使用 WebSecurityConfigurerAdapter
如前所述,从 Spring Security 5.7.0-M2 开始,WebSecurityConfigurerAdapter 已被弃用。因此,如果您使用 Spring Security 5.7.0-M2 或更高版本,请更新您的实现,如下面的代码片段所示。
SecurityConfig.java
package com.dev.springboot.security.UserDetailsService.config;

import org.springframework.beans.factory.annotation.Autowired;
import org.springframework.context.annotation.Bean;
import org.springframework.context.annotation.Configuration;
import org.springframework.security.authentication.AuthenticationProvider;
import org.springframework.security.authentication.dao.DaoAuthenticationProvider;
import org.springframework.security.config.annotation.web.builders.HttpSecurity;
import org.springframework.security.config.annotation.web.configuration.EnableWebSecurity;
import org.springframework.security.core.userdetails.UserDetailsService;
import org.springframework.security.crypto.bcrypt.BCryptPasswordEncoder;
import org.springframework.security.web.SecurityFilterChain;
import org.springframework.security.web.util.matcher.AntPathRequestMatcher;

@EnableWebSecurity
@Configuration
public class SecurityConfig {

	@Autowired
	private UserDetailsService uds;

	@Autowired
	private BCryptPasswordEncoder encoder;

	@Bean
	public SecurityFilterChain filterChain(HttpSecurity http) throws Exception {

		http.authorizeRequests()
		.antMatchers("/home","/register","/saveUser").permitAll()
		.antMatchers("/welcome").authenticated()
		.antMatchers("/admin").hasAuthority("Admin")
		.antMatchers("/mgr").hasAuthority("Manager")
		.antMatchers("/emp").hasAuthority("Employee")
		.antMatchers("/hr").hasAuthority("HR")
		.antMatchers("/common").hasAnyAuthority("Employeee,Manager,Admin")
		.anyRequest().authenticated()

		.and()
		.formLogin()
		.defaultSuccessUrl("/welcome",true)

		.and()
		.logout()
		.logoutRequestMatcher(new AntPathRequestMatcher("/logout"))

		.and()
		.exceptionHandling()
		.accessDeniedPage("/accessDenied")

		.and()
		.authenticationProvider(authenticationProvider());

		return http.build();

	}

	@Bean
	public AuthenticationProvider authenticationProvider() {
		DaoAuthenticationProvider authenticationProvider = new DaoAuthenticationProvider();
		authenticationProvider.setUserDetailsService(uds);
		authenticationProvider.setPasswordEncoder(encoder);
		return authenticationProvider;
	}
}
最后我们完成了编码部分。
如何测试启用安全的应用程序?
虽然“测试”这个词对于开发人员来说看起来很容易,但它同样重要,因为它提供了我们整体实现的结果。在测试应用程序时,您应该将 SecurityConfig 类的 configure(HttpSecurity http) 方法保留在您面前,然后按照以下步骤操作:
启动应用程序:右键单击项目,然后选择“Run As”»“Spring Boot App”。
输入注册页面网址 http://localhost:8080/register,然后检查是否每个人都可以访问,甚至不需要登录应用程序。
输入必填字段值并相应地单击“注册”按钮完成注册过程。
现在输入您在注册时选择的角色特定的任何 URL。假设您输入 URL http://localhost:8080/admin,那么它应该将您重定向到内置的登录页面。
输入凭据(电子邮件 ID 代替用户名)并登录到应用程序。它会将您重定向到默认的成功 URL,即欢迎页面。
现在输入网址 http://localhost:8080/admin
对其他角色也重复上述步骤。
此外,如上所述,将代码放在您面前并随后测试每个场景。
概括
在完成“如何使用 UserDetailsService 在 Spring Boot 中实现安全性?”的所有理论和示例部分之后,最后,我们能够在 Spring Boot 项目中实现 Web 安全性。当然,在本文中我们介绍了实现安全功能的第三种方法。同样,我们将在接下来的文章中讨论更多安全方法,例如 REST 安全性。未来若有任何变化,我们将进行相应更新。
如果您想了解有关 Spring Security 的更多信息,请访问 spring.io 文档。另外,欢迎在评论区提出你的意见。
原文链接:https://javatechonline.com/how-to-implement-security-in-spring-boot-using-userdetailsservice/
