[译]OAuth2 with Spring 第5部分:使用PKCE保护您的Spring Boot应用程序以增强安全性
免责声明:本文技术性很强,需要清楚了解本系列前几篇文章,特别是第 1 部分和第 3 部分。
带有代码交换证明密钥 (PKCE) 的授权代码流用于无法存储客户端机密的应用程序。此类应用程序包括:
- 原生应用程序——可以反编译并检索客户端凭证的移动应用程序。
- 单页应用 — 整个源代码可在浏览器中使用。因此,无法安全地存储客户端机密。
怎么运行的
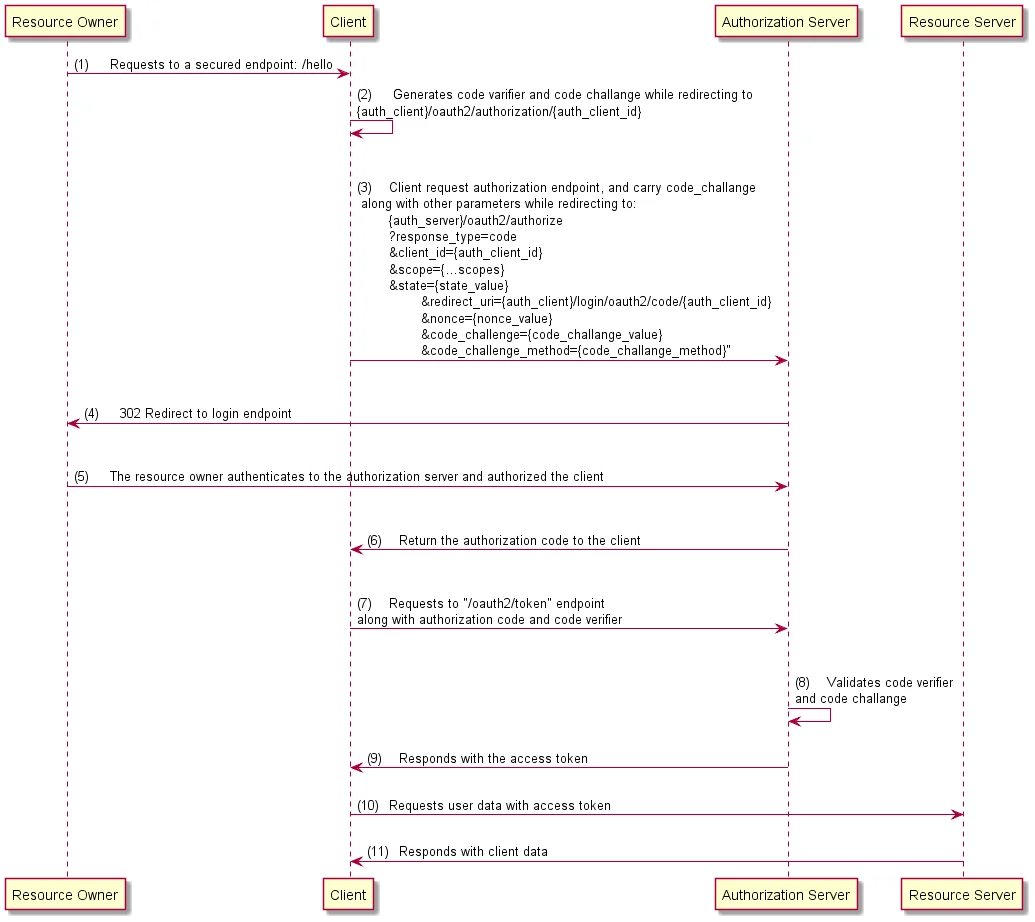
Spring Boot OAuth2 与 PKCE
希望这张图已经足够清晰易懂了。因此,我将直接进入演示。
对于此演示,我们有 3 台服务器。
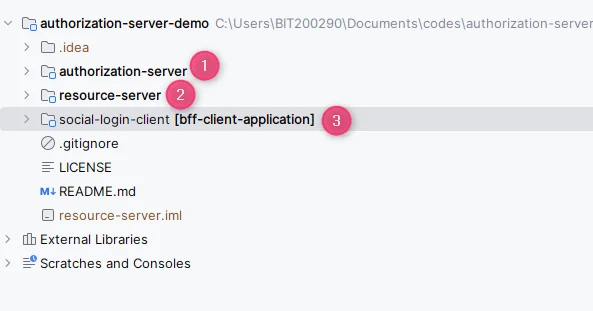
- 授权服务器:在端口 9001 上运行。
- 资源服务器:在端口8090上运行。
- 社交登录客户端(BFF):在端口 8080 上运行。
让我们看一下代码。
授权服务器
一、pom.xml
授权服务器的 pom.xml 中没有太多需要解释的变化
application.yml.yml
application.yml文件有很多更改,特别是删除了客户端注册。当前版本的application.yml非常简短,如下所示。
server:
  port: 9001

logging:
  level:
    org:
      springframework:
        security: trace
三. SecurityConfig 类
所有的安全配置以及客户端和用户详细信息注册、JWT token 解码都放在此类中
@Configuration
public class SecurityConfig {

    / This first SecurityFilterChain Bean is only specific to authorization server specific configurations
    / More on this can be found in this stackoverflow question answers:
    / https://stackoverflow.com/questions/69126874/why-two-formlogin-configured-in-spring-authorization-server-sample-code
    @Bean
    @Order(1)
    public SecurityFilterChain authorizationServerSecurityFilterChain(HttpSecurity http) throws Exception {

        OAuth2AuthorizationServerConfiguration.applyDefaultSecurity(http);
        http.getConfigurer(OAuth2AuthorizationServerConfigurer.class).oidc(withDefaults());

        return http
                .exceptionHandling(e -> e
                        .authenticationEntryPoint(new LoginUrlAuthenticationEntryPoint("/login")))
                .oauth2ResourceServer(httpSecurityOAuth2ResourceServerConfigurer ->
                                              httpSecurityOAuth2ResourceServerConfigurer.jwt(withDefaults())
                )
                .build();

    }

    / This second SecurityFilterChain bean is responsible for any other security configurations
    @Bean
    @Order(2)
    public SecurityFilterChain clientAppSecurityFilterChain(HttpSecurity http) throws Exception {
        return http
                .formLogin(withDefaults())
                .authorizeHttpRequests(authorize ->authorize.anyRequest().authenticated())
                .build();

    }

    / In-memory user registration
    @Bean
    public UserDetailsService userDetailsService() {
        var user1 = User.withUsername("user")
                .password("{noop}secret")
                .authorities("read")
                .build();
        return new InMemoryUserDetailsManager(user1);
    }

    / In-memory authorization server client registration
    @Bean
    public RegisteredClientRepository registeredClientRepository() {
        RegisteredClient registeredClient = RegisteredClient.withId("oidc-client")
                .clientId("oidc-client")
                .clientSecret("{noop}secret")
                .scope("read")
                .scope(OidcScopes.OPENID)
                .scope(OidcScopes.PROFILE)
                .scope("write")
                .redirectUri("http://127.0.0.1:8080/login/oauth2/code/oidc-client")
                .clientAuthenticationMethod(ClientAuthenticationMethod.CLIENT_SECRET_BASIC)
                .authorizationGrantType(AuthorizationGrantType.AUTHORIZATION_CODE)
                .authorizationGrantType(AuthorizationGrantType.REFRESH_TOKEN)
                .clientSettings(clientSettings())
                .build();

        return new InMemoryRegisteredClientRepository(registeredClient);
    }

    /**
     * Creating this bean initialized the following endpoints:
     * /oauth2/authorize
     * /oauth2/device_authorization
     * /oauth2/token
     * /oauth2/jwks
     * /oauth2/revoke
     * /oauth2/introspect
     * /connect/register
     * /userinfo
     * /connect/logout
     *
     * For java based client registration configuration, it is very important to initialize this bean
    */
    @Bean
    public AuthorizationServerSettings authorizationServerSettings() {
        return AuthorizationServerSettings.builder().build();
    }

    @Bean
    ClientSettings clientSettings() {
        return ClientSettings.builder()
                .requireAuthorizationConsent(true)  / Display post-login authorization consent screen
                .requireProofKey(true)              / flag to enable Proof Key for Code Exchange (PKCE)
                .build();
    }

    @Bean
    public JwtDecoder jwtDecoder(JWKSource<SecurityContext> jwkSource) {
        return OAuth2AuthorizationServerConfiguration.jwtDecoder(jwkSource);
    }

    @Bean
    public JWKSource<SecurityContext> jwkSource() {
        RSAKey rsaKey = generateRsa();
        JWKSet jwkSet = new JWKSet(rsaKey);
        return (jwkSelector, securityContext) -> jwkSelector.select(jwkSet);
    }

    public static RSAKey generateRsa() {
        KeyPair keyPair = generateRsaKey();
        RSAPublicKey publicKey = (RSAPublicKey) keyPair.getPublic();
        RSAPrivateKey privateKey = (RSAPrivateKey) keyPair.getPrivate();
        return new RSAKey.Builder(publicKey).privateKey(privateKey).keyID(UUID.randomUUID().toString()).build();
    }

    static KeyPair generateRsaKey() {
        KeyPair keyPair;
        try {
            KeyPairGenerator keyPairGenerator = KeyPairGenerator.getInstance("RSA");
            keyPairGenerator.initialize(2048);
            keyPair = keyPairGenerator.generateKeyPair();
        } catch (Exception ex) {
            throw new IllegalStateException(ex);
        }
        return keyPair;
    }
}
现在启动授权服务器。
资源服务器
一、pom.xml
pom.xml 必须包含spring-boot-starter-oauth2-resource-server依赖项以及其他依赖项。
<dependency>
    <groupId>org.springframework.boot</groupId>
    <artifactId>spring-boot-starter-oauth2-resource-server</artifactId>
</dependency>
从配置角度来看,资源服务器仅包含application.yml
application.yml
我们需要在application.yml文件中提及令牌发行者 uri。
server:
  port: 8090

spring:
  security:
    oauth2:
      resourceserver:
        jwt:
          issuer-uri: http://localhost:9001
三.SecurityConfig
SecurityConfig 类的目的是验证来自授权服务器的访问令牌,并根据需要为资源服务器本身定义的端点添加额外的安全配置。
social-login-client
一、pom.xml
pom.xml 必须包含spring-boot-starter-oauth2-client依赖项以及其他依赖项。此外,由于我们使用了 webClient,因此我们添加了spring-boot-starter-webflux依赖项。
<dependency>
     <groupId>org.springframework.boot</groupId>
     <artifactId>spring-boot-starter-oauth2-client</artifactId>
  </dependency>

  <dependency>
     <groupId>org.springframework.boot</groupId>
     <artifactId>spring-boot-starter-webflux</artifactId>
  </dependency>
application.yml
application.yml文件包含客户端本身的配置以及授权过程中要通信的 URL。下面给出了我的oidc-client注册的完整代码。
spring:
  security:
    oauth2:
      client:
        registration:

          # Client registration starts here
          oidc-client:

            # Our oidc-client needs a provider. The provider information has been registered
            # at the bottom of this configuration
            provider: spring

            # The following client-id and client-secret will be sent to the authorization server
            # We don't need to mention the client_credentials in the grant type here.
            # Note that, here the client-secret must not contain {noop} or any other encoding type mentioned.
            client-id: oidc-client
            client-secret: secret

            # Our authorization grant type is authorization_code
            authorization-grant-type: authorization_code

            # The following redirect URL is the redirect URL definition of our client Server application.
            # It is generally the current application host address. The authorization server's redirect URL
            # definition means that this URL will be triggered when auth server redirects data to here.
            redirect-uri: http://127.0.0.1:8080/login/oauth2/code/oidc-client

            # Scopes that will be displayed for requesting in the consent page.
            # Authorization server must have equal or more scopes than these in number
            scope:
              - openid
              - profile
              - read
              - write

            # This client name will display in the login screen as social login type
            client-name: oidc-client

        # As mentioned above about provider, here we register the provider details
        # for any unknown provider with their issuer URI
        provider:
          spring:
            issuer-uri: http://localhost:9001
三.SecurityConfig
我们需要编写 SecurityConfig 类以使 PKCE 能够生成代码解析器和代码质询,放置 OAuth2Login 端点的逻辑并保护客户端应用程序中定义的端点。
完整的代码如下所示。
@Configuration
public class SecurityConfig {

    @Bean
    SecurityFilterChain securityFilterChain(HttpSecurity http, ClientRegistrationRepository clientRegistrationRepository) throws Exception {

        String base_uri = OAuth2AuthorizationRequestRedirectFilter.DEFAULT_AUTHORIZATION_REQUEST_BASE_URI;
        DefaultOAuth2AuthorizationRequestResolver resolver = new DefaultOAuth2AuthorizationRequestResolver(clientRegistrationRepository, base_uri);

        / Responsible for enabling PKCE, to generate code verifier, code challenge
        resolver.setAuthorizationRequestCustomizer(OAuth2AuthorizationRequestCustomizers.withPkce());

        http
            .authorizeHttpRequests(authorize -> authorize
                    .requestMatchers("/").permitAll()
                    .anyRequest().authenticated())
            .oauth2Login(oauth2Login -> {
                oauth2Login.loginPage("/oauth2/authorization/oidc-client");
                oauth2Login.authorizationEndpoint(authorizationEndpointConfig ->
                  authorizationEndpointConfig.authorizationRequestResolver(resolver)
                );
            })
            .oauth2Client(withDefaults());
        return http.build();
    }
}
iv. WebClientConfig
为了让 webClient 无缝地与 OAuth2 协同工作,我们需要定义WebClientConfig并添加更多 bean。
@Configuration
public class WebClientConfig {
    @Bean
    public HelloClient helloClient(OAuth2AuthorizedClientManager authorizedClientManager) throws Exception {
        return httpServiceProxyFactory(authorizedClientManager).createClient(HelloClient.class);
    }

    private HttpServiceProxyFactory httpServiceProxyFactory(OAuth2AuthorizedClientManager authorizedClientManager) {
        ServletOAuth2AuthorizedClientExchangeFilterFunction oauth2Client =
                new ServletOAuth2AuthorizedClientExchangeFilterFunction(authorizedClientManager);

        oauth2Client.setDefaultOAuth2AuthorizedClient(true);
        WebClient webClient = WebClient.builder()
                .apply(oauth2Client.oauth2Configuration())
                .build();
        WebClientAdapter client = WebClientAdapter.forClient(webClient);
        return HttpServiceProxyFactory.builder(client).build();
    }

    @Bean
    public OAuth2AuthorizedClientManager authorizedClientManager(
            ClientRegistrationRepository clientRegistrationRepository,
            OAuth2AuthorizedClientRepository authorizedClientRepository) {

        OAuth2AuthorizedClientProvider authorizedClientProvider =
                OAuth2AuthorizedClientProviderBuilder.builder()
                        .authorizationCode()
                        .refreshToken()
                        .build();

        DefaultOAuth2AuthorizedClientManager authorizedClientManager =
                new DefaultOAuth2AuthorizedClientManager(
                        clientRegistrationRepository, authorizedClientRepository);

        authorizedClientManager.setAuthorizedClientProvider(authorizedClientProvider);

        return authorizedClientManager;
    }

}
如果您注意到HelloClient的 bean ,这样我们就可以定义更多的客户端,使业务服务(资源服务器)调用过程更容易。
v.调用资源服务器
我们需要定义一个
@HttpExchange("http://localhost:8090")
public interface HelloClient {

    @GetExchange("/")
    String getHello();
}
现在让我们从控制器调用*getHello()*方法。
@RestController
@RequestMapping("/")
public class AppController {

    @Autowired
    private AppService appService;

    private final HelloClient helloClient;

    public AppController(HelloClient helloClient) {
        this.helloClient = helloClient;
    }

    @GetMapping("/")
    public ResponseEntity<String> getPublicData() {
        return ResponseEntity.ok("Public data");
    }

    @GetMapping("/private-data")
    public ResponseEntity<String> getPrivateData() {
        return ResponseEntity.ok(appService.getJwtToken());
    }

    @GetMapping("/hello")
    public ResponseEntity<String> sayHello () {
        return ResponseEntity.ok(helloClient.getHello());
    }
}
在浏览器中测试的时间
在开始之前,让我们更改 application.yml 中的日志配置以查看所有 3 个服务器的调试日志。
logging:
  level:
    org.springframework.boot: error
    org.springframework.security: debug
    org.springframework.security.web: debug
    org.apache.catalina: error
    com.mainul35:
      - info
      - trace
      - debug
      - error
      - warn
现在,我们在浏览器中输入**(1)** http://localhost:8080/hello 。它将带我们到授权服务器的登录端点,在我们的例子中是http://localhost:9001/login。但在此之前,它会进行几次重定向。让我们先通过浏览器的网络选项卡查看它。
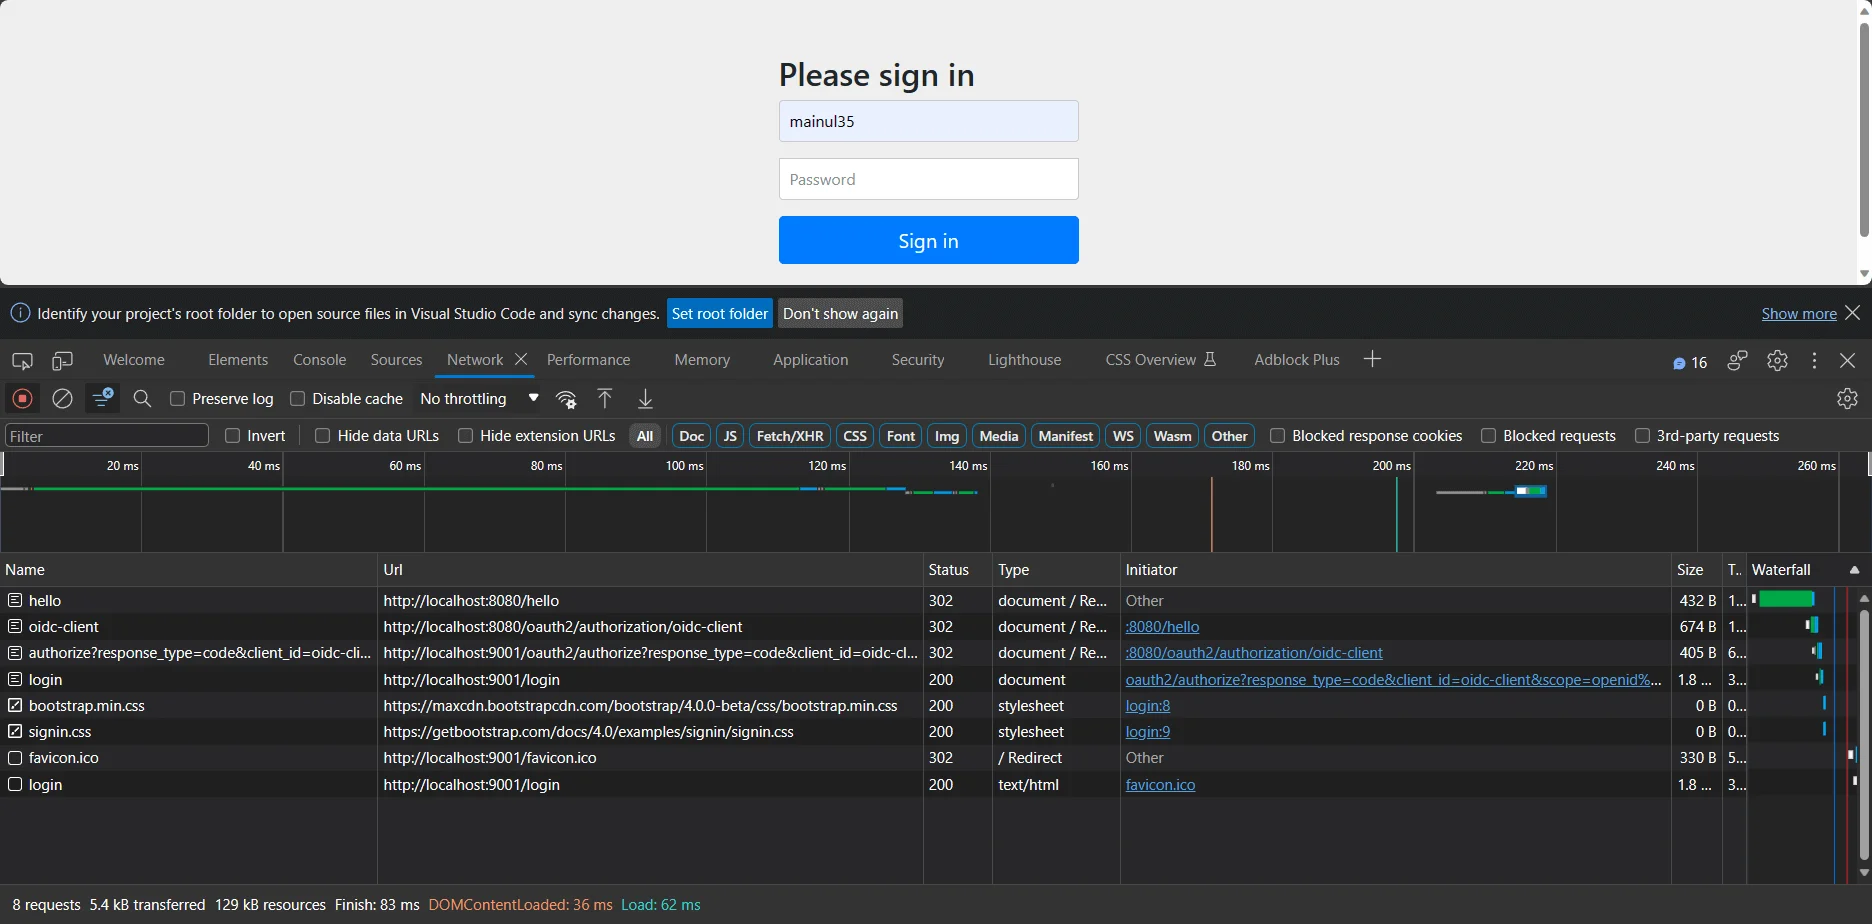
网络响应
如果我们注意到上述网络响应,我们可以看到,当我们请求 /hello 端点时,它首先将我们重定向到**(2)** http://localhost:8080/oauth2/authorization/oidc-client端点。
然后,从客户端授权端点,我们再次被重定向到授权服务器的以下端点。(3)
当授权服务器发现该请求尚未获得授权时,它会再次重定向到授权服务器的登录端点。(4)
现在,让我们提供正确的用户凭证并观察。
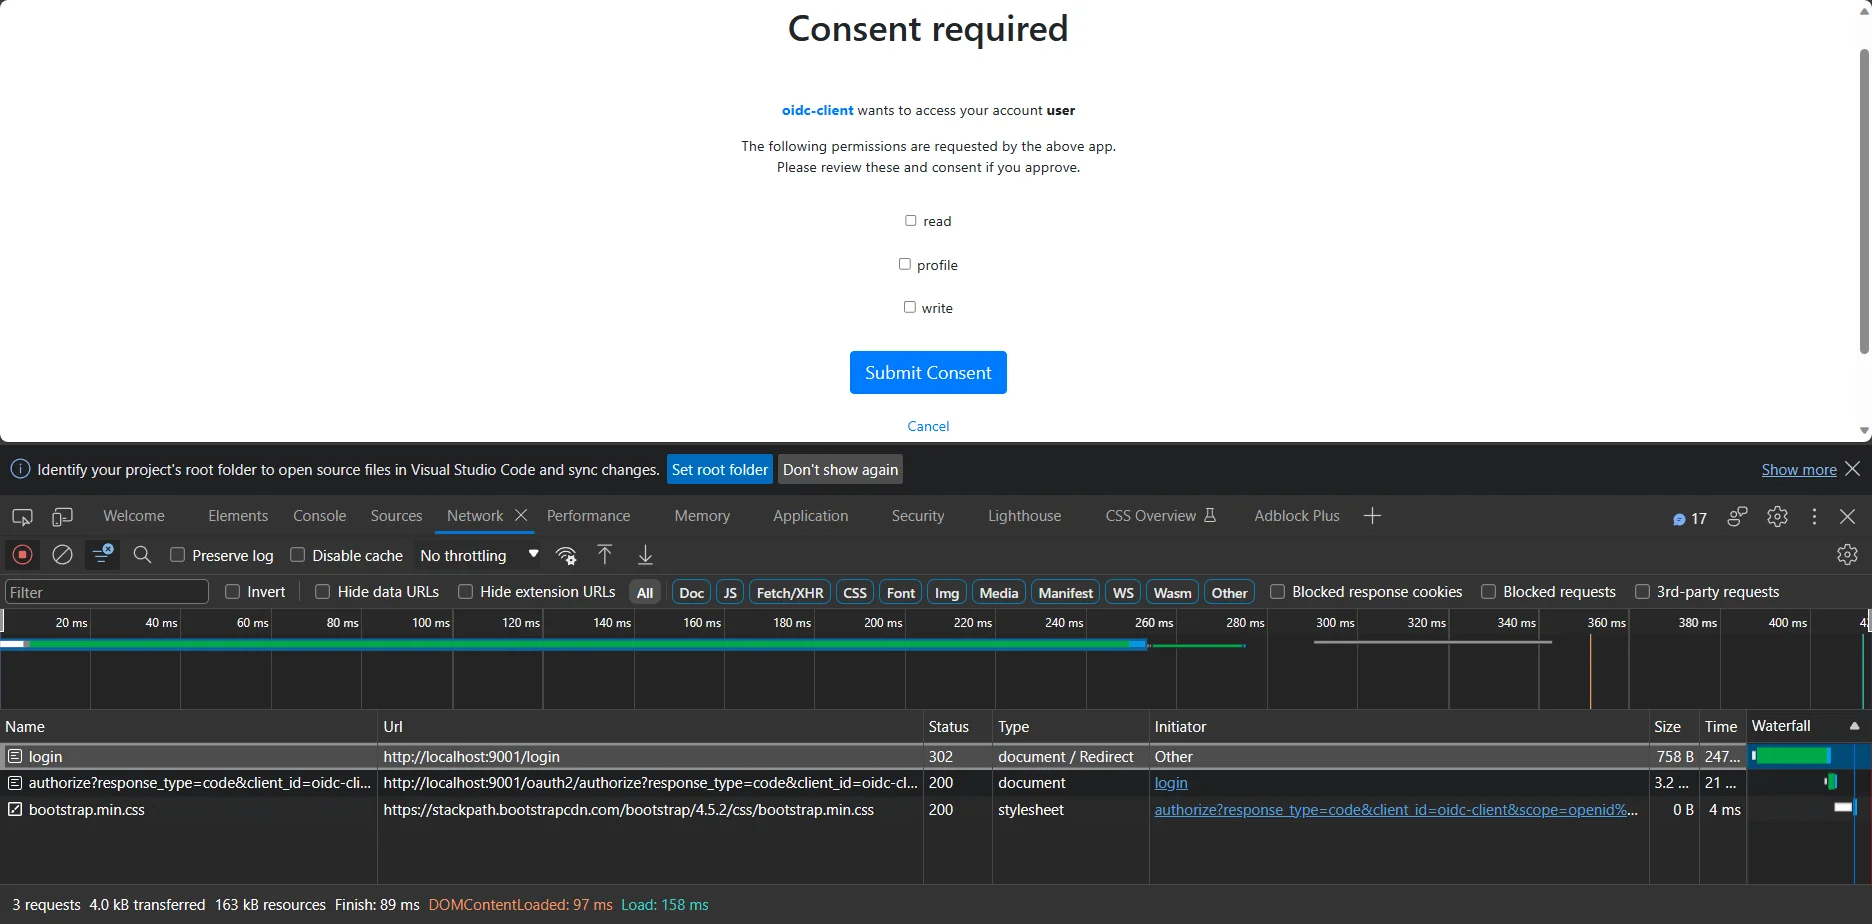
提供登录凭证后
它首先使用 POST 方法将表单提交到登录端点。我们可以在浏览器网络选项卡中看到另一个重定向。
接下来,如果身份验证成功,我们将进入授权同意屏幕。网址如下。(5)
注意,如果我们授权应用程序但未获得所有同意,则可能会将我们重定向到相同的同意屏幕。因此,在提供一些同意后,我们可以点击取消,或提供所有同意。
现在,让我们提供一些同意并继续。就我的情况而言,我将提供所有同意并提交。
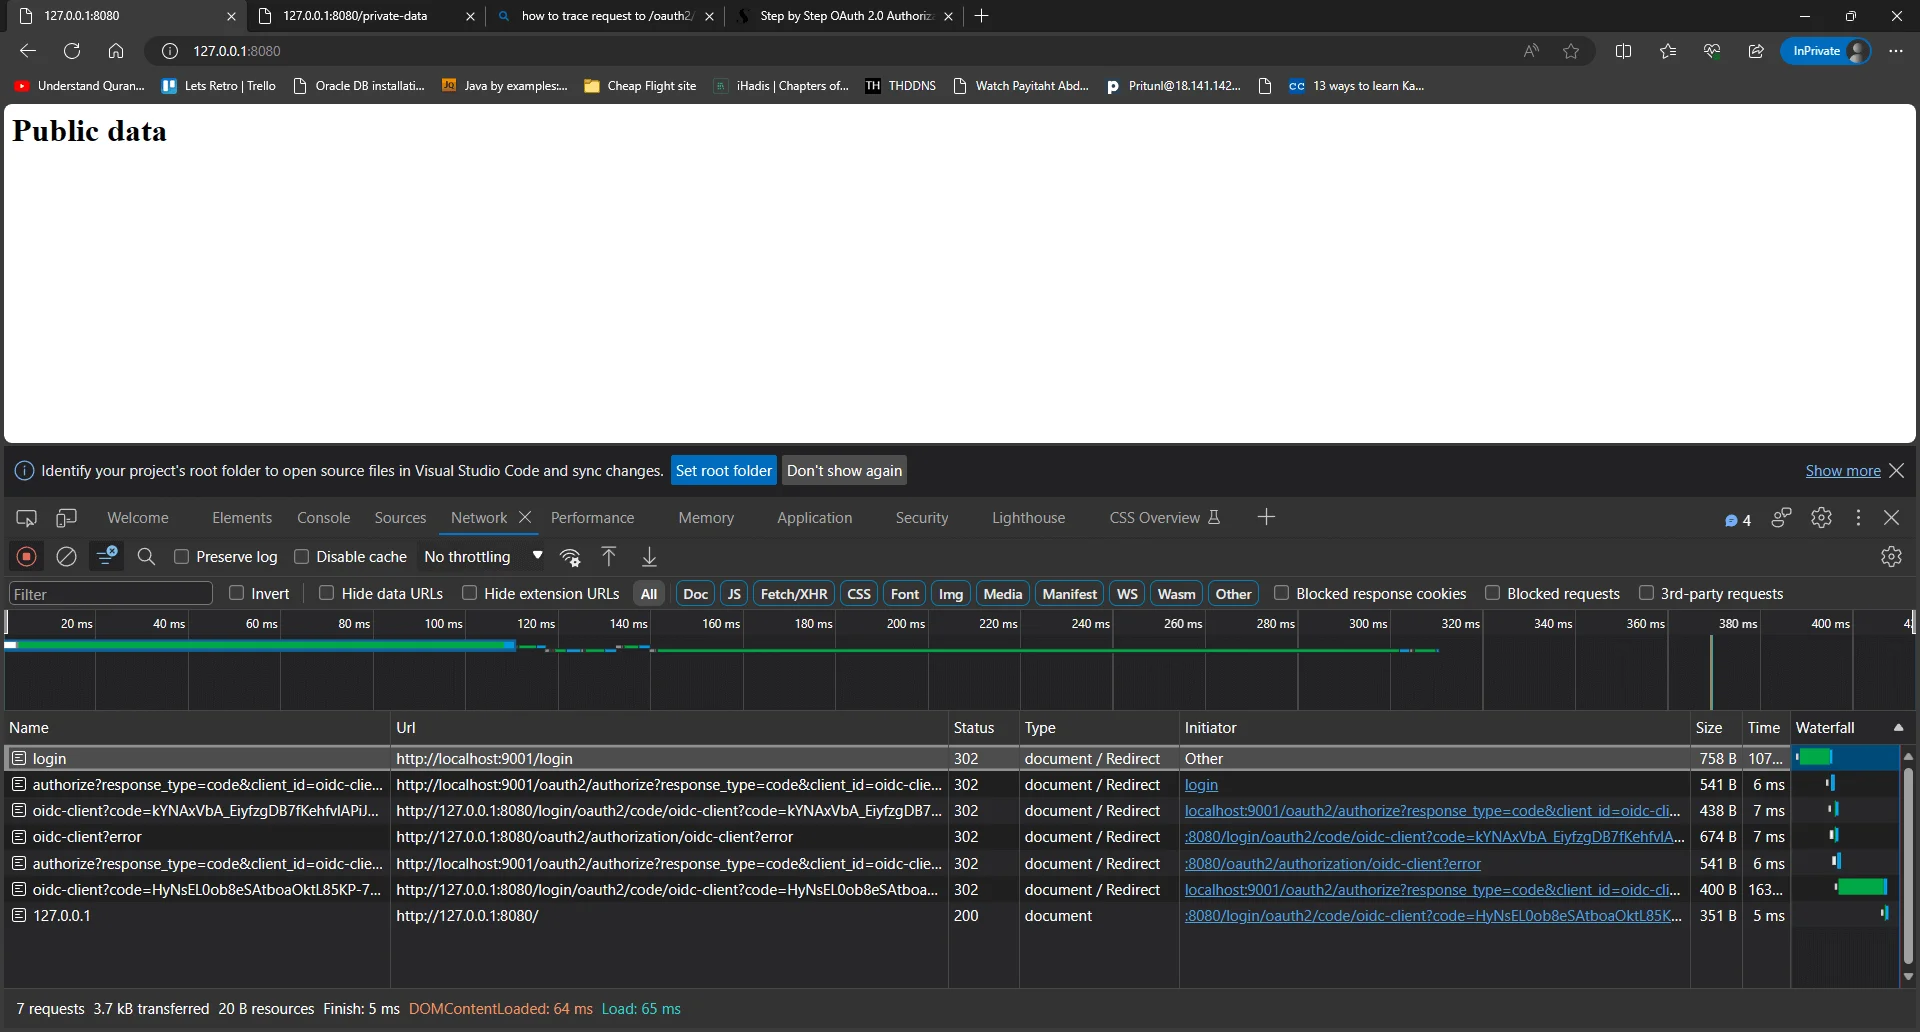
长话短说,成功登录后,它会将我们重定向到客户端应用程序的 /login/oauth2/code/oidc-client 端点,并附带授权码参数。使用此代码,我们可以请求 /oauth2/token 端点来获取访问令牌。
现在我们可以再次向 /hello 端点发出请求并查看其是否正常工作。
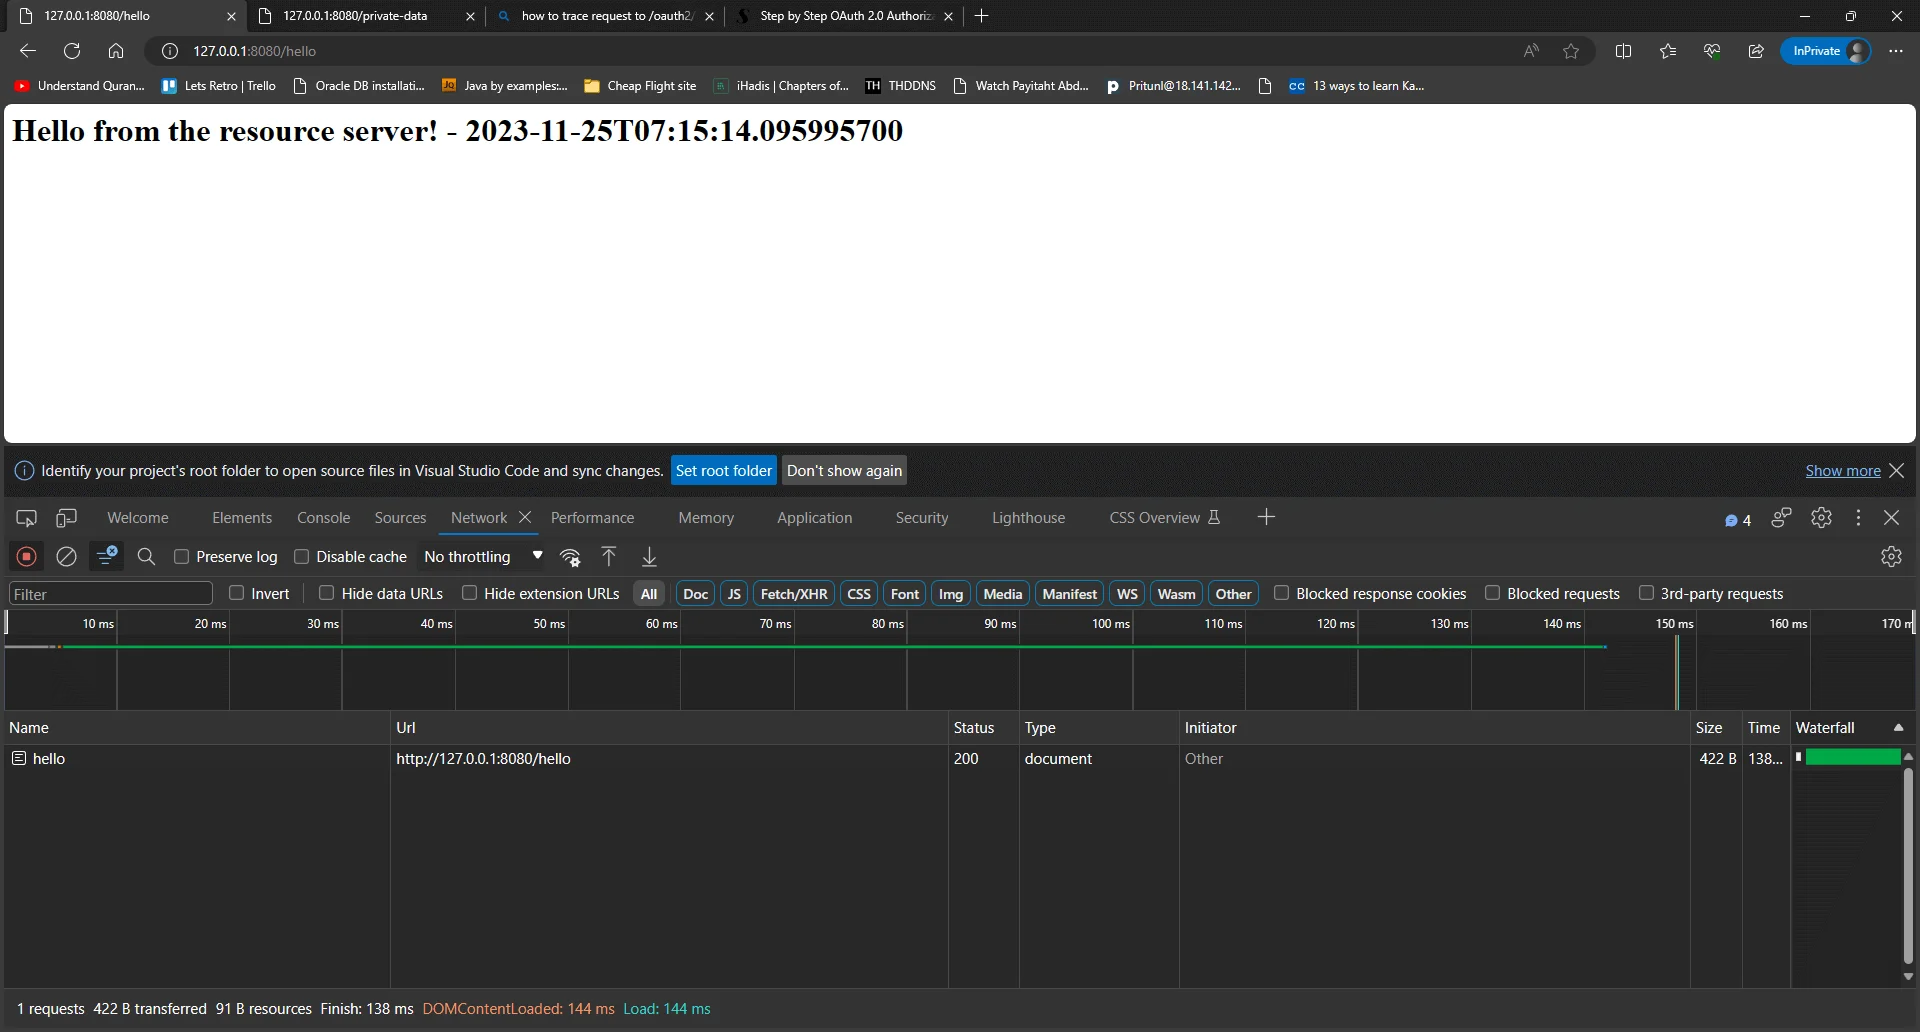
来自 /hello 端点的响应
为什么收到代码后没有对 /oauth/token 端点发出任何请求?
从IETF网站提供的以下OAuth2 for Browser based Apps草案中我们可以看到,对于PKCE,它不必在授权服务器中颁发访问令牌。
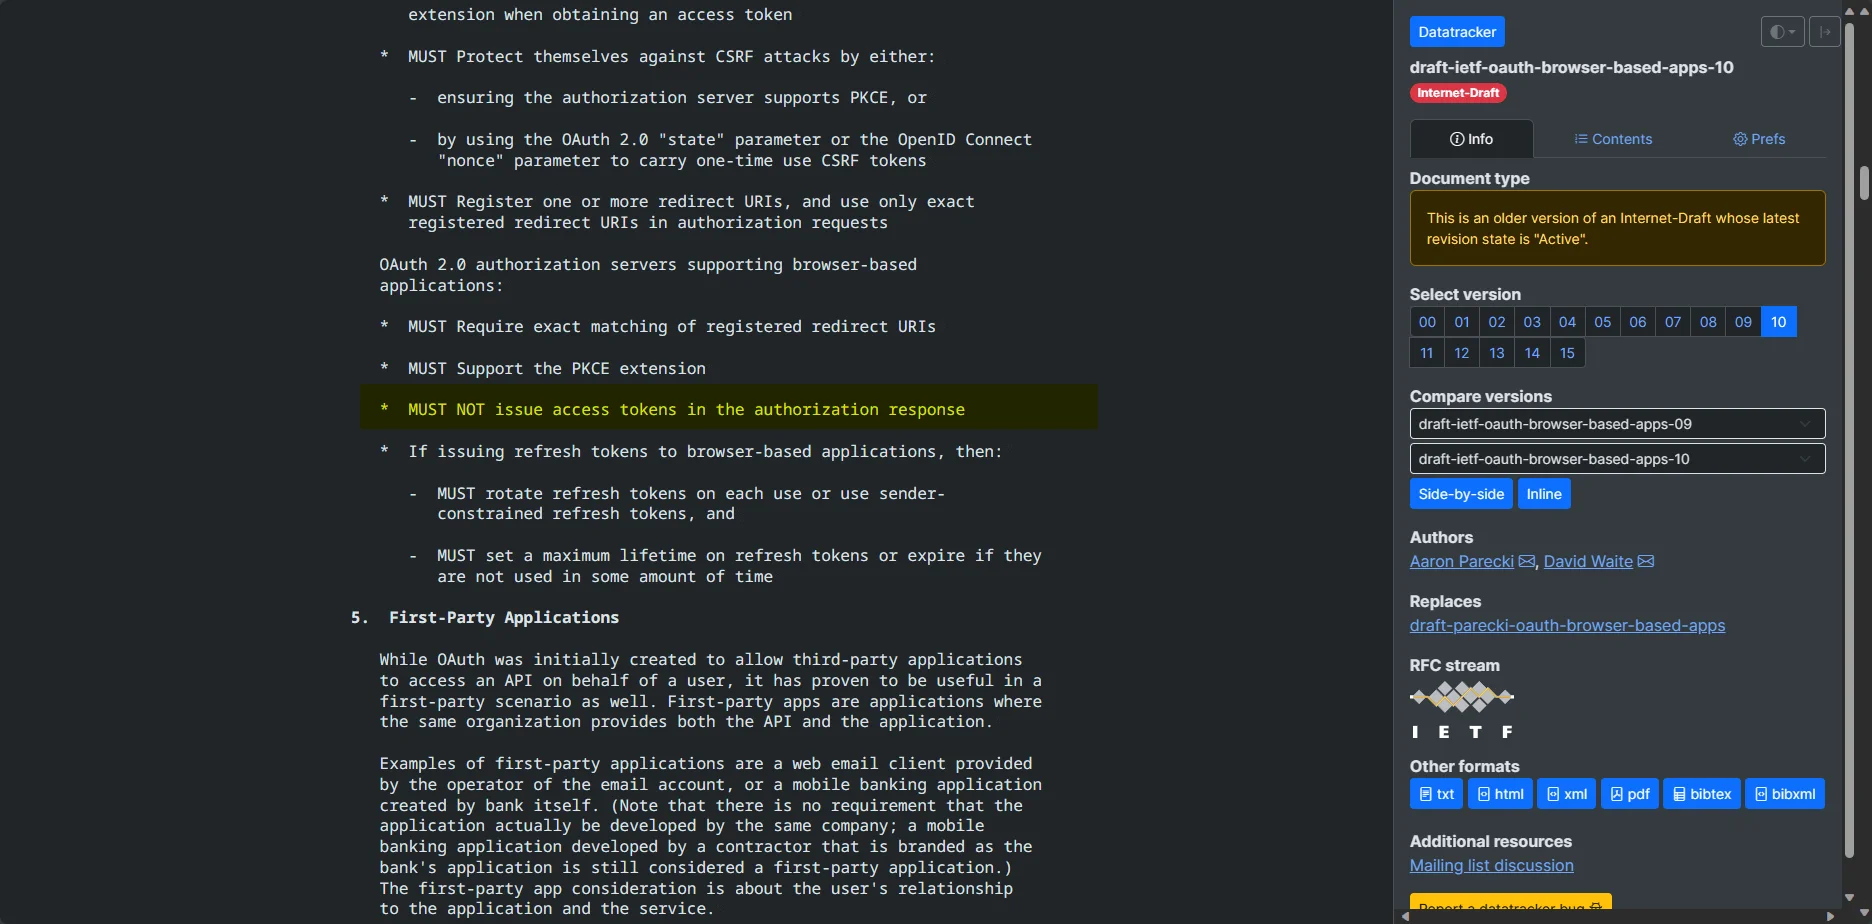
以下是草案的链接:draft-ietf-oauth-browser-based-apps-10
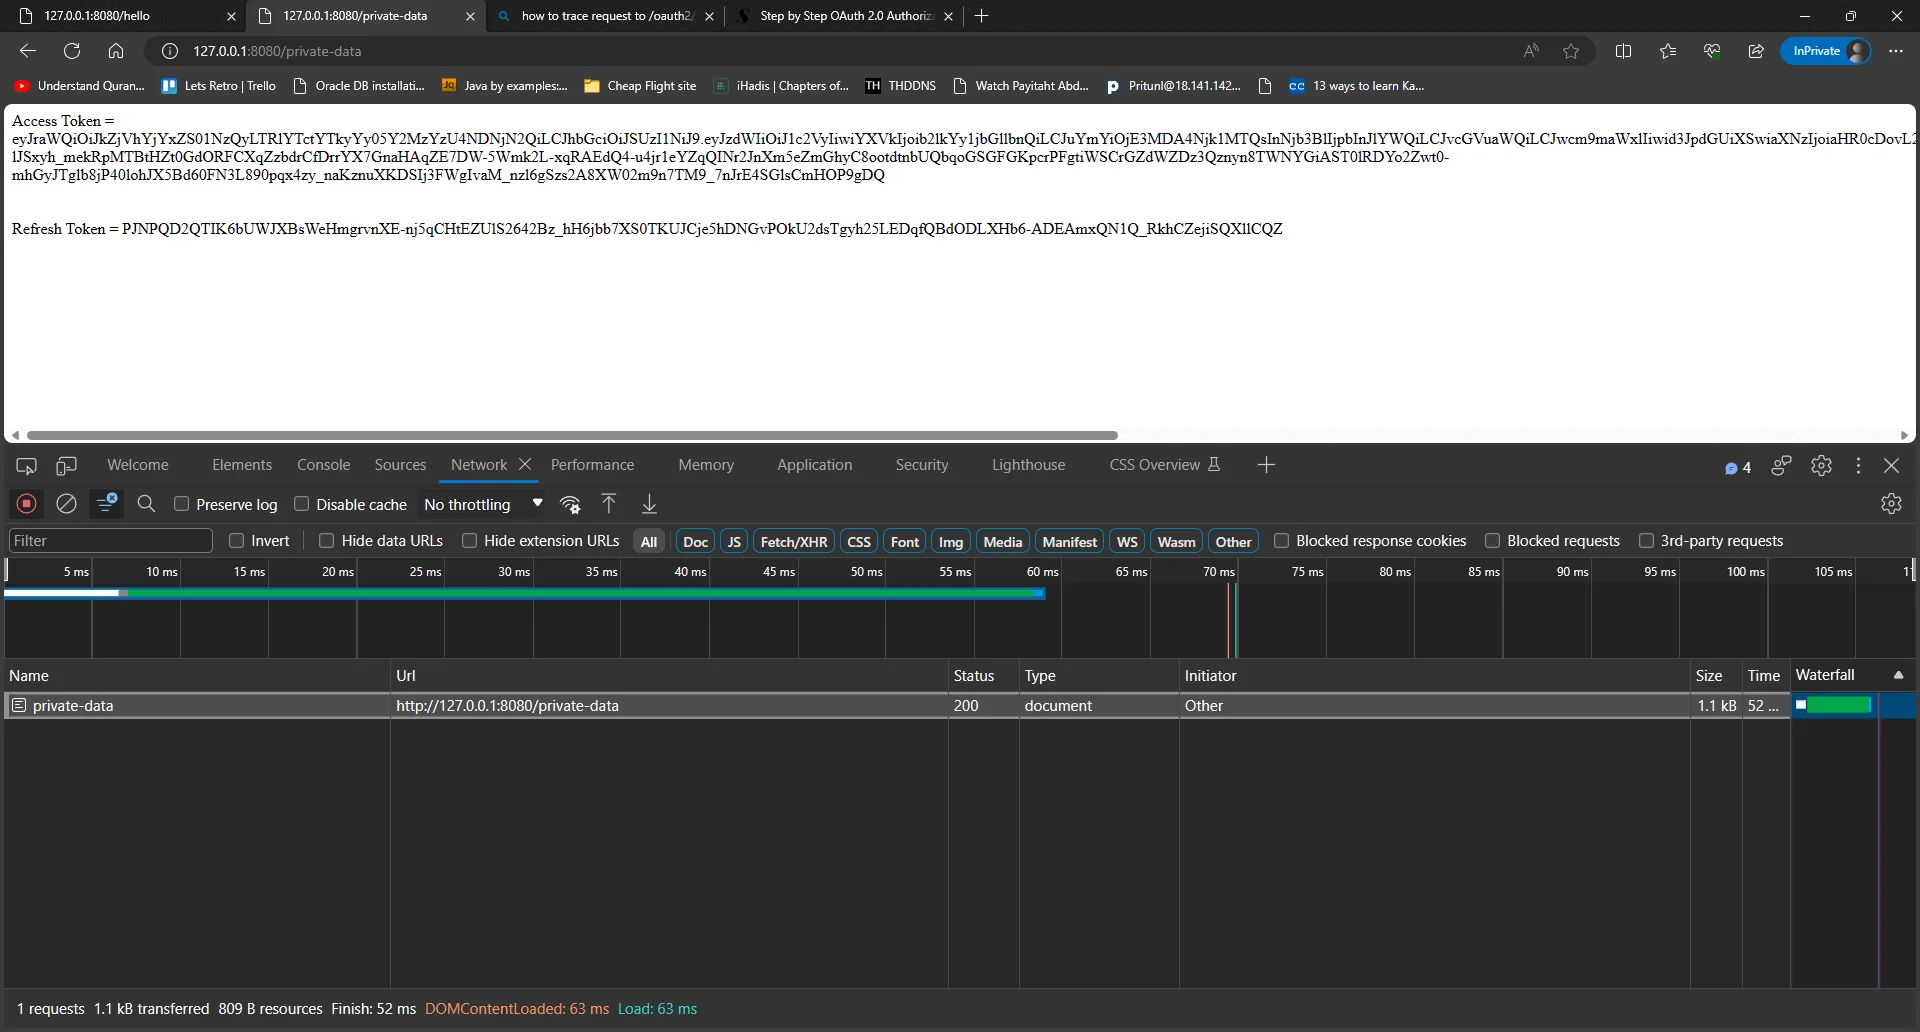
如果我们仍然想获取令牌,在我的客户端应用程序中,我提供了一个端点127.0.0.1:8080/private-data,我们可以通过它获取令牌。
完整的源代码可以在这里找到
